Welcome to Part 3 of the WordPress Security Research Beginner Series! If you haven’t yet, take a minute to check out the series introduction to get a sense of what this series is all about. You’ll also want to catch up on Part 1, where we dig into WordPress request architecture and hooks, and Part 2, which covers WordPress’s core security architecture from a vulnerability research perspective.
In Part 2, we focused on understanding how WordPress handles things like authentication, capability checks, and input validation — basically how developers should be securing their code, and what it looks like when they don’t.
Now that you have a good understanding on how to identify code that has been appropriately (and inappropriately) protected by developers, we are going to review how to set up your research lab to conduct the most efficient and effective WordPress security research.
A solid lab environment is crucial to becoming an efficient WordPress vulnerability researcher. It’s not just about getting WordPress running on your machine — it’s about creating a flexible, low-friction environment that makes it easy to test, break, rebuild, and explore without wasting time managing configurations.
You could spin up a basic virtual machine, install WordPress manually, and poke around with your favorite IDE. That works, especially when you’re just getting started. But as you dive deeper, you’ll quickly run into limitations:
- Management Overhead: When things break (and they will), you may have to fix or rebuild the environment manually.
- Fixed Environment Profile: Successful exploitation of some vulnerabilities might require a certain version of PHP or MySQL, or even NGINX over Apache, meaning the need for multiple instances with different versions or configurations, all of which would have to be manually configured.
- Repeatability: If you want to share your setup or revisit it later, redoing everything manually is tedious and error-prone.
- Performance and Isolation: VM-based setups can be heavy, especially if you’re switching between multiple environments. You might also want to keep certain test cases isolated from one another.
This guide will walk you through setting up a research lab using the best tools and configurations that help you spend less time managing your environment and more time doing what matters: finding vulnerabilities. We’ll also throw in a few tools, tips, and tricks used by experienced WordPress researchers along the way.
We hope that by providing this beginner series on WordPress vulnerability research, you’ll use the knowledge you’ve gained to participate in the Wordfence Bug Bounty Program, where you can earn up to $31,200 for each vulnerability reported.
By finding and reporting these vulnerabilities, you play a direct role in strengthening the layered defenses that help keep the WordPress ecosystem secure.
Table of Contents
- Choosing a Platform for Your WordPress Instance
- Essential Configuration for wp-config.php
- Configuring PHP and Server Constraints
- PHP Version Nuances
- MySQL Nuances in WordPress Security
- Debugging with XDebug
- Useful Features in Code Editors for Vulnerability Research
- Obtaining Older Versions of Plugins and Themes
- Setting Up WordPress User Accounts
- Web Application Security Testing Tools
- WP Directory: Searching for Vulnerable Code
- Additional Tools and Resources
- Conclusion
Choosing a Platform for Your WordPress Instance
There are several platforms that are ideal for creating an isolated and reproducible WordPress environment. The isolation property is important, as it allows multiple instances with a variety of PHP, MySQL, web server software, and WordPress versions to exist on the same machine. The reproducible property is important as it allows a specific WordPress instance configuration (e.g. PHP 7.4.30, MySQL 8.0.35, Apache HTTP Server, and WordPress 6.7.2) to be torn down and re-built again (e.g., if you break the instance during vulnerability testing).
We’ll cover the three most popular platforms for creating a testing environment:
Docker
Docker enables containerized applications that can be deterministically built via a docker-compose.yaml file. This means that we can specify the software, dependencies, and configurations within this yaml file and create an environment that’s always the same when it’s built.
Pros
- Works on Windows, Mac, and Linux
- Not only is it isolated at a software level, but it’s also isolated at a network and file system level
- Easy to modify the
docker-compose.yamlandDockerfileconfigurations - By default, instances don’t see each other, so you can run multiple instances at the same time.
Cons
- Container-level isolation requires virtualization, so it requires more system resources
- Because of its abstraction layer, you’ll need to familiarize yourself with many docker-specific commands to manage containers, run WP-CLI, access the isolated file system, etc.
- For a fully custom, reproducible WordPress environment, it requires quite a bit of customization and orchestration.
Wordfence provides a Docker package for our official Wordfence Bug Bounty Program WordPress instance. This package comes with everything you need, including XDebug for PHP Debugging, Adminer for database access, WP-CLI for command-line interaction with WordPress, and Mailcatcher to view emails sent by the WordPress instance.
Installing and Configuring the Wordfence Docker WordPress Instance
- Clone the git repository from Github:
- Follow the instructions in the README.md file
- Visit
http://localhost:1337to finish setting up WordPress
git clone https://github.com/wordfence/bbp-dockerwp.git
WP Engine’s Local
WP Engine’s Local is software designed to enable simple and efficient local WordPress development. Local is very easy to install and uses a Graphical User Interface (GUI) for configuration and management.
Pros
- Works on Windows, Mac, and Linux via GUI.
- Takes seconds to stand up a WordPress instance.
- Uses a wizard during instance creation for quick selection of configuration parameters like PHP and MySQL software versions and web server type (Apache or NGINX).
- Comes with XDebug for PHP debugging, AdminerEVO for database access, Mailpit for email access.
- Can run multiple instances of WordPress with different configurations on the same machine at the same time.
- One-click self-signed certificate trust to enable HTTPS.
Cons
- Configuration options are limited.
- Software level isolation only (not virtualized).
- NGINX routing (regardless of whether you’re using NGINX or Apache as the web server) might make some plugins think you’re running NGINX.
Installing and Configuring WP Engine’s Local
- Download Local: https://localwp.com/releases/
- Install Local using the instructions specific to your operating system: https://localwp.com/help-docs/getting-started/installing-local/
- Create a site and follow the wizard, making sure to choose the Custom option on the Choose your environment page so you can select your desired PHP version, web server, and Database (MySQL) version.
- Once you have finished the wizard and the site has been created, make sure to toggle the Xdebug option.
- Visit http://<your_site_name>.local
Devbox
Jetify’s Devbox provides portable, isolated development environments by using the Nix package manager. Reproducible configurations are managed by a devbox.json file that can be used to build the environment similar to Docker, however without virtualization.
Pros
- Works on Windows (via WSL), Mac, and Linux
- Low resource consumption (no virtualization)
- Highly configurable and portable, easy to modify
Cons
- You can’t run multiple instances at the same time, unless you manually modify ports in devbox.json
- For a fully custom, reproducible WordPress environment, it requires quite a bit of customization and orchestration via devbox.json, similar to Docker.
- Software level isolation only (not virtualized)
Installing and Configuring Devbox Using the Wordfence Configuration
- Install Devbox: https://www.jetify.com/docs/devbox/installing_devbox/
- Create a folder for your WordPress site
- Clone the Wordfence Devbox Git repository
- Follow the instructions in the
README.mdfile - Visit
http://localhost:8081
git clone https://github.com/wordfence/bbp-wordpress-devbox
Essential Configuration for wp-config.php
Before you start looking at code for vulnerabilities, it’s important to make a few key changes to your wp-config.php file. These changes are critical to getting accurate exploitation results as well as helping you emulate realistic production environments.
Disabling unfiltered_html
By default, WordPress gives users with the Administrator and Editor roles the unfiltered_html capability. That means these users can place raw HTML and JavaScript in post content, widgets, and other inputs. So if you’re testing while logged in as a user with this capability (e.g. admin), you can inject and execute scripts all day long — but that’s not a vulnerability. That’s just WordPress doing what it was designed to do. This is a common false positive we see from researchers, so ensuring your site is optimally configured can help prevent discovering and reporting XSS injection points that are the result of unfiltered_html.
To test for high-privilege XSS vulnerabilities, you need to explicitly disable this capability so that any JavaScript execution is truly the result of a plugin or theme failing to sanitize user input — not just WordPress letting Admins do whatever they want.
To do this, add the following define line to your wp-config.php under the Add any custom values… comment:
/* Add any custom values between this line and the "stop editing" line. */

define( 'DISALLOW_UNFILTERED_HTML', true );
With this constant set, WordPress will prevent Admin and Editor users from posting unfiltered HTML or JavaScript, which allows you to accurately test whether a plugin or theme is improperly allowing unsafe HTML.
unfiltered_html for all site-level Admins and editors by default. Only Super Admins retain the ability to post unfiltered content. In fact, WordPress ignores the DISALLOW_UNFILTERED_HTML constant entirely on Multisite setups — the restriction is hardcoded. So if you’re testing on Multisite, this step is unnecessary (and ineffective).
Debug Mode and Error Reporting
You’ll want to keep debugging mode off (default) to emulate production environments. This will let you correctly see errors or warnings that reveal paths or sensitive details. However, if you do need to diagnose a problem with a plugin or theme, temporarily enabling error reporting in wp-config.php could be helpful.
The following highlights how to enable WordPress debugging, however, as we previously mentioned we recommend leaving this disabled.
define( 'WP_DEBUG', true );
define( 'WP_DEBUG_DISPLAY', true );
define( 'WP_DEBUG_LOG', true );
When enabled, errors will be written to wp-content/debug.log, which can be useful for tracing things like undefined variables, failed function calls, or unexpected input types. Just don’t forget to turn it back off when you’re done.
wp-config.php file. This is useful when you want to test an arbitrary file deletion vulnerability and you want to see if testing on a live wp-config.php works.
Configuring PHP and Server Constraints
Some plugins and themes — especially larger themes and page builders — require more memory, longer execution times, large POST request data size, or larger file uploads than what PHP allows by default. If your lab is using these default limits, you might hit errors when installing or activating certain plugins, uploading large themes, or importing demo content.
Recommended PHP Settings
You can modify these in your php.ini file, or in your Docker setup, Local environment, Devbox config, or wherever your PHP settings live.
memory_limit = 512M
upload_max_filesize = 128M
post_max_size = 128M
max_execution_time = 120
Here’s what each setting does:
memory_limit: Increases how much memory a PHP script can use.upload_max_filesize: Allows you to upload large plugin or theme zip files via the WordPress dashboard.post_max_size: Must be equal to or greater than upload_max_filesize — it affects the total size of a POST request (including form fields and files).max_execution_time: Gives slower operations (like large imports or installs) enough time to complete without getting cut off.
These values are set intentionally high. In a local lab environment, there’s no need to be stingy here — and the last thing you want is to troubleshoot a failed plugin install only to realize it was due to a 30-second timeout or a 2MB upload limit.
Locating php.ini in Your Environment
To modify settings like memory_limit, upload_max_filesize, or max_execution_time, you’ll need to find and edit the active php.ini file for your environment. Here’s how to locate it in each setup.
Docker (Wordfence Bug Bounty Program Docker Package)
The Wordfence BBP Docker setup doesn’t mount a custom php.ini file — instead, the container uses the default PHP config located at:
/usr/local/etc/php/php.ini
To verify this or locate it dynamically, you can exec into the running container and run:
docker exec -it wordpress-wpd php -i | grep "Loaded Configuration File"
You should see output like:
Loaded Configuration File => /usr/local/etc/php/php.ini
If you want to change PHP settings:
- Exec into the container:
- Edit the file using nano or vi:
- Restart the container:
docker exec -it wordpress-wpd bash
vi /usr/local/etc/php/php.ini
docker restart wordpress-wpd
php.ini file from the container to your project folder and mount it in docker-compose.yaml like this:
version: '3.8'
services:
  wordpress:
	container_name: wordpress-wpd

...// truncated for brevity

volumes:
  - ./php.ini:/usr/local/etc/php/php.ini
Local (WP Engine’s Local App)
Each Local site has its own PHP configuration, but the actual php.ini is generated from a template file called php.ini.hbs.
To adjust PHP settings like memory_limit or upload_max_filesize:
- In the Local app, under “Local sites” right-click a site and select “Site Folder”.
- Navigate to:
- Open
php.ini.hbsin a text editor and update or add the desired settings. - Save the file and restart the site from the Local UI.
<site-name>/conf/php/php.ini.hbs
php -i | grep "Loaded Configuration File"
This will show the location of the real php.ini file generated by the hbs template.
Devbox (Jetify)
Within the folder created for your site, the php.ini is located at:
devbox.d/php/php.ini
To adjust PHP settings:
- Open
devbox.d/php/php.iniin your editor. - Add or modify the relevant values.
- After saving the changes, restart Devbox services to apply them:
- Press F10 to close the Devbox services dashboard.
- Then run:
devbox services up
This will relaunch the environment with your updated PHP settings.
PHP Version Nuances
WordPress core, plugins, and themes are expected to work across a range of PHP versions — but that doesn’t mean vulnerabilities behave the same way in each version.
If you’re testing a plugin on PHP 7.4 and everything seems exploitable, don’t assume it works the same on PHP 8.x. Small differences in how PHP handles certain errors or inputs can cause a payload to fail silently or throw a fatal error that halts execution completely.
Real-World Behavioral Differences
One major difference is how PHP handles function calls and warnings. In PHP 7, certain types of incorrect input might just throw a warning and keep going. In PHP 8, those same warnings often become fatal errors that stop the entire script from running.
A good example of this is CVE-2024-9047, an Unauthenticated Path Traversal to Arbitrary File Read and Deletion in WordPress File Upload. During exploitation, an undefined constant, COOKIEPATH is used. In PHP 7.4, this triggers a warning:
PHP Warning: Use of undefined constant COOKIEPATH - assumed 'COOKIEPATH' (this will throw an Error in a future version of PHP) in /C:/xampp/htdocs/wp.local/wp-content/plugins/wp-file-upload/lib/wfu_functions.php on line 6551
In PHP 8.x, using this undefined constant triggers a fatal error, halting execution and preventing the exploit from succeeding.
When the developer initially attempted to patch this vulnerability, they fixed the undefined constant issue. Later, another researcher discovered a bypass to the patch for CVE-2024-9047. Because the COOKIEPATH issue was fixed, the bypass was now exploitable on both PHP 7.4 and PHP 8.x instances.
This is a great example of how a successful exploit in PHP 7.4 can break entirely in PHP 8.
Here are some more examples:
- CVE-2023-6971: Successful exploitation of this vulnerability requires that the target server’s php.ini is configured with allow_url_include set to on. This feature is deprecated as of PHP 7.4 and is disabled by default, but can still be explicitly enabled in later versions of PHP.
- CVE-2024-10519: This vulnerability was only exploitable on PHP 7.4 because exploitation triggers a fatal error in 8.x versions.
PHAR Deserialization and Version-Specific Exploits
In PHP 7.x, deserializing data from a phar:// stream is a common technique for reaching a gadget chain through file operations like file_exists(), file_get_contents(), or exif_read_data().
In PHP 8.x, some of these behaviors have changed or been hardened. If you’re testing deserialization vulnerabilities, especially ones that rely on PHAR wrappers, you’ll want to test explicitly on PHP 7.4 or earlier.
Example:
- CVE-2025-2485: This is a Unauthenticated PHP Object Injection via PHAR to Arbitrary File Deletion vulnerability. The mechanism of action is the automatic deserialization in the
file_exists()function when it receives aphar://URI. This particular vulnerability is only exploitable in PHP versions less than 8.
For these reasons, it’s a good idea to maintain separate PHP 7.4 and 8.x environments in your lab.
Wordfence Docker Package with PHP 8.x
As mentioned in the “Installing and Configuring the Wordfence Docker WordPress Instance” section, the standard Wordfence Docker package is configured to install PHP 7.4. However, we have so far emphasized that having a flexible lab environment is important when testing vulnerabilities. In this section, we will show you how to modify the Wordfence Docker package to use PHP 8.x.
The first thing you will need to do is edit the Dockerfile to modify the base image the WordPress instance is built from as well as modifying the XDebug installation directives to ensure compatibility.
- Unzip the
wordfencebbpdocker.zippackage. - Edit the
Dockerfilefile in thexdebugfolder. - Change
FROM wordpress:php7.4toFROM wordpress:php8.4. - Comment out the entire section for XDebug and add
RUN pecl install xdebug. - Finally, modify the wp-cli version in
docker-compose.ymlfile to match the PHP version in the core container (image: wordpress:cli-php8.0toimage: wordpress:cli-php8.4).


Once you’ve modified and saved the Dockerfile and the docker-compose.yml, follow the instructions in the “Installing and Configuring the Wordfence Docker WordPress Instance” section to build and run the containers.
MySQL Nuances in WordPress Security
WordPress requires MySQL (or MariaDB) – it can’t be run on PostgreSQL. Most researchers might pick the latest MySQL version for their research environment and call it a day. However, differences between certain MySQL versions can affect whether certain SQL injection techniques are exploitable.
Real-World Example: Subquery-Based SQL Injection in ORDER BY
In one real-world case, a SQL injection vulnerability was discovered in an ORDER BY clause. The injection is a subquery-based time delay (note that the following is one of many requests that will enumerate the response of the MySQL version() function):
SELECT SQL_CALC_FOUND_ROWS wp_plugin_logs.*
FROM wp_plugin_logs
WHERE 1=1
AND wp_plugin_logs.type IN (
  'event_type_a',
  'event_type_b',
  'event_type_c',
  'points_add',
  'points_subtract',
  'points_use',
  'points_grant',
  'points_revoke',
  'badge_earned',
  'badge_assigned'
)
ORDER BY (
  SELECT/**/sleep(12)/**/
  FROM/**/dual/**/
  WHERE/**/version()/**/LIKE/**/0x3025
)# ASC
LIMIT 0, 10;
This particular subquery injection technique works reliably on some versions of MySQL (e.g., 5.7.28 and 8.0.16), where the subquery was evaluated as part of the ORDER BY clause. But in newer versions (e.g., 8.0.35), the optimizer skipped execution of the subquery entirely, preventing the SLEEP() delay from occurring — even though the injection was still happening.
When in doubt, make sure to test across multiple MySQL versions or try alternate payloads before giving up on a suspected SQL injection.
wp_magic_quotes() on certain superglobals, preventing SQL injection in many instances.
Debugging with XDebug
XDebug is an essential tool for any WordPress vulnerability researcher. It allows you to set breakpoints, inspect variables, trace execution, and step through plugin or theme code line-by-line. These features are invaluable when you are trying to understand how user input flows through the application, especially in complex scenarios with multiple layers of abstraction.
Setting Up XDebug in Your Environment
Wordfence Docker Environment and Devbox
Both the Wordfence Bug Bounty Docker package and Devbox configuration come with XDebug already installed and configured. To use it in Visual Studio Code (VSCode):
- Install the PHP Debug extension by XDebug (xdebug.org).
- In VSCode, open the Run and Debug tab (left sidebar) or from the menu, select Run -> Add Configuration.
- Click “create a launch.json file“, and select PHP.
- Save the generated config (launch.json) and close the tab (you don’t need to change anything unless you’re customizing ports).
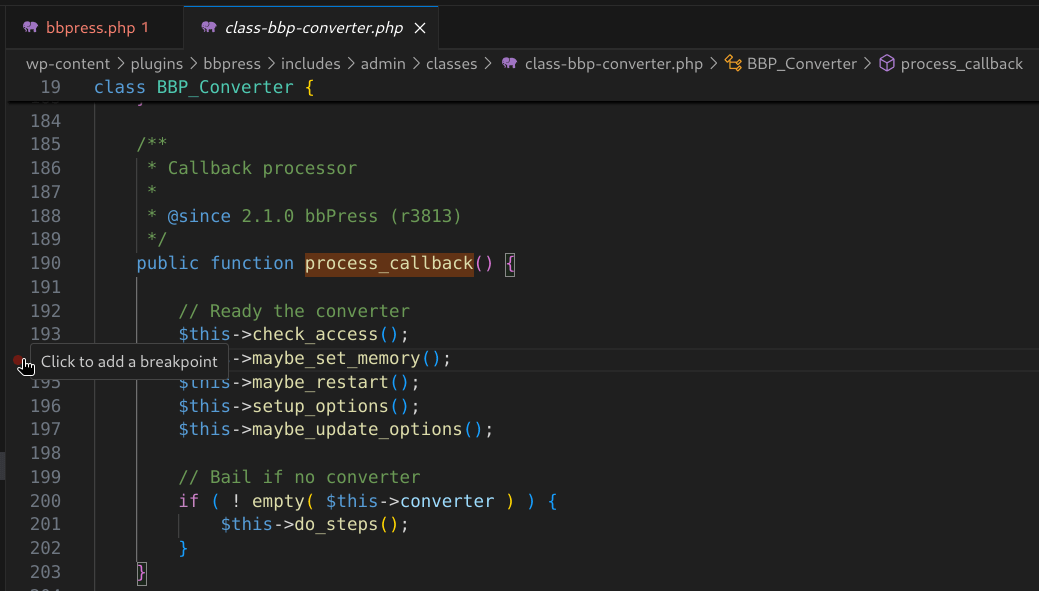
- Set breakpoints in a plugin (wp-content/plugins) or theme (wp-content/themes) by opening a PHP file and clicking to the left of a line number.
- Click “Start Debugging” (green play button) or press F5.
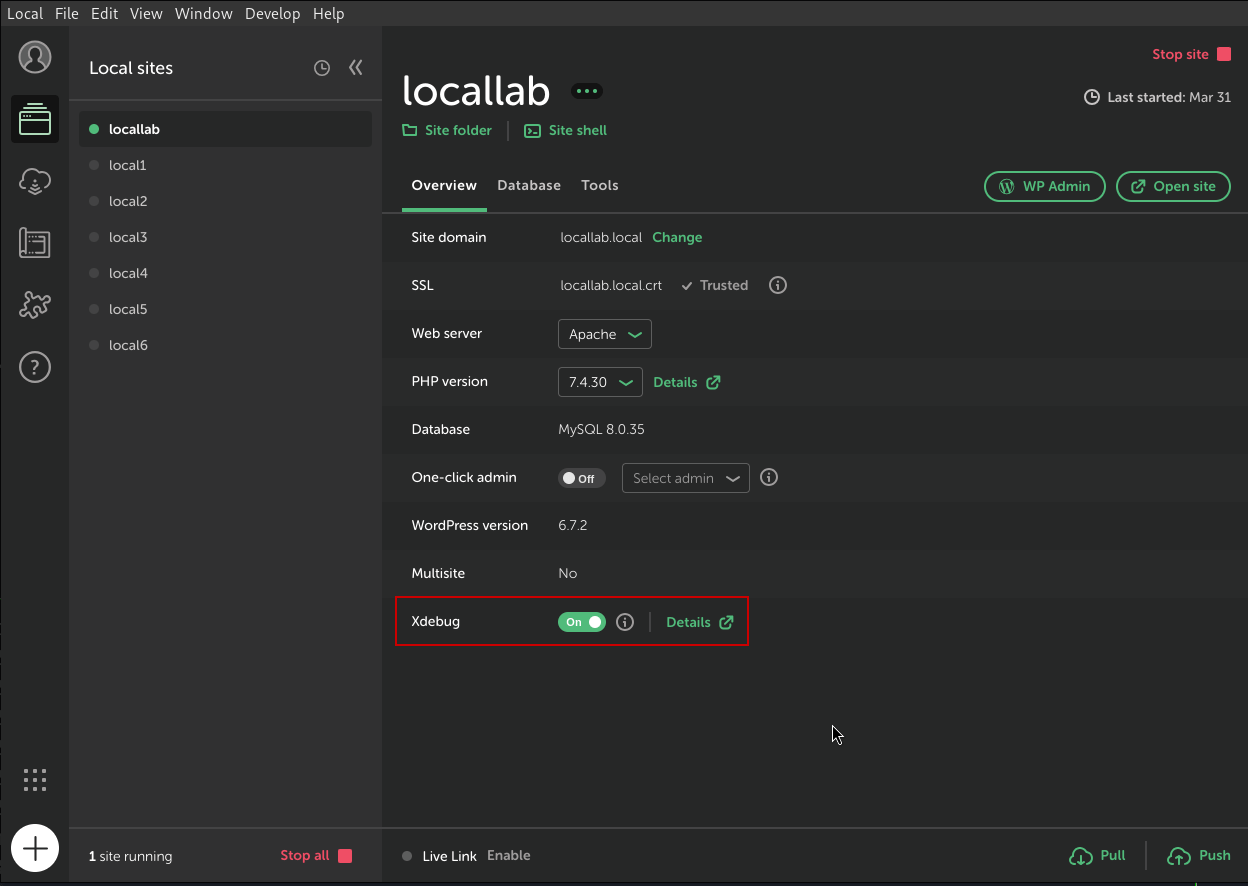
WP Engine’s Local
Local also comes with XDebug built-in, but you need to manually enable it per site:
- In the Local app, click on your site.
- Go to the “Overview” tab (default).
- Click the toggle for Xdebug.
- Follow the same steps as above in the Setting Up XDebug in Your Environment section (install PHP Debug extension, create launch.json, set breakpoints, start debugger).
Setting Up PHPStorm for XDebug
PHPStorm has built-in support for XDebug and doesn’t require an extension like Visual Studio Code.
WPEngine’s Local and Devbox
Using WPEngine’s Local (with XDebug Enabled) or the Wordfence Devbox configuration, debugging with PHPStorm is as simple as clicking a button.
To connect XDebug in PHPStorm:
- Open your project in PHPStorm.
- Set breakpoints in a plugin (wp-content/plugins) or theme (wp-content/themes) by opening a PHP file and clicking on a line number.
- Click the “bug” icon in the top right corner of the application called “Start Listening for PHP Debug Connection”


Wordfence Docker
To use PHPStorm with the Wordfence Docker package, you will follow the same steps above, but we’ll need to add one additional configuration – path mapping – since we’ll be opening the local wp folder from the Docker package in PhpStorm, but the path for WordPress in the container is different (/var/www/html).
- Click the Settings (gear)
 icon in the top right corner.
- Go to to PHP -> Servers
- In the localhost server, under the Project files File/Directory, set the Absolute path on the server path to
/var/www/html.

Useful Features in Code Editors for Vulnerability Research
Visual Studio Code PHP Intelephense Plugin
PHP Intelephense adds additional features for PHP to assist in efficient vulnerability research. Once installed, it gives you:
“Go to Definition” and “Find all References“: Right-click on a function name and you can jump directly to its definition or see every place it’s used.

Hover docs: Hover over WordPress core functions or plugin-defined functions to see signatures and doc comments.
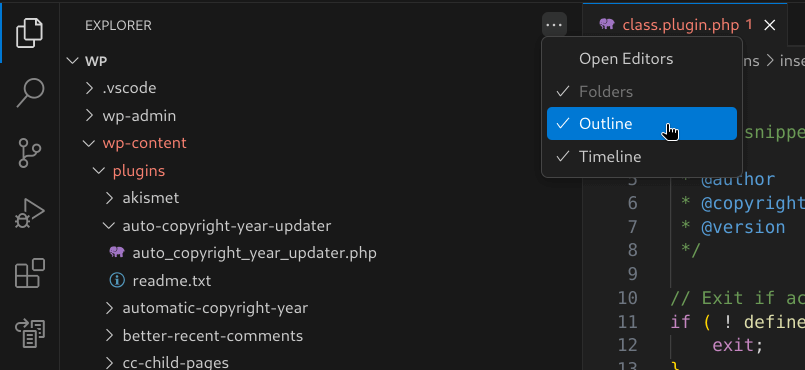
Outline View and Symbol Tree: Useful for navigating large plugin files.

These features are incredibly helpful when you’re trying to trace a source to a sink and vice versa.
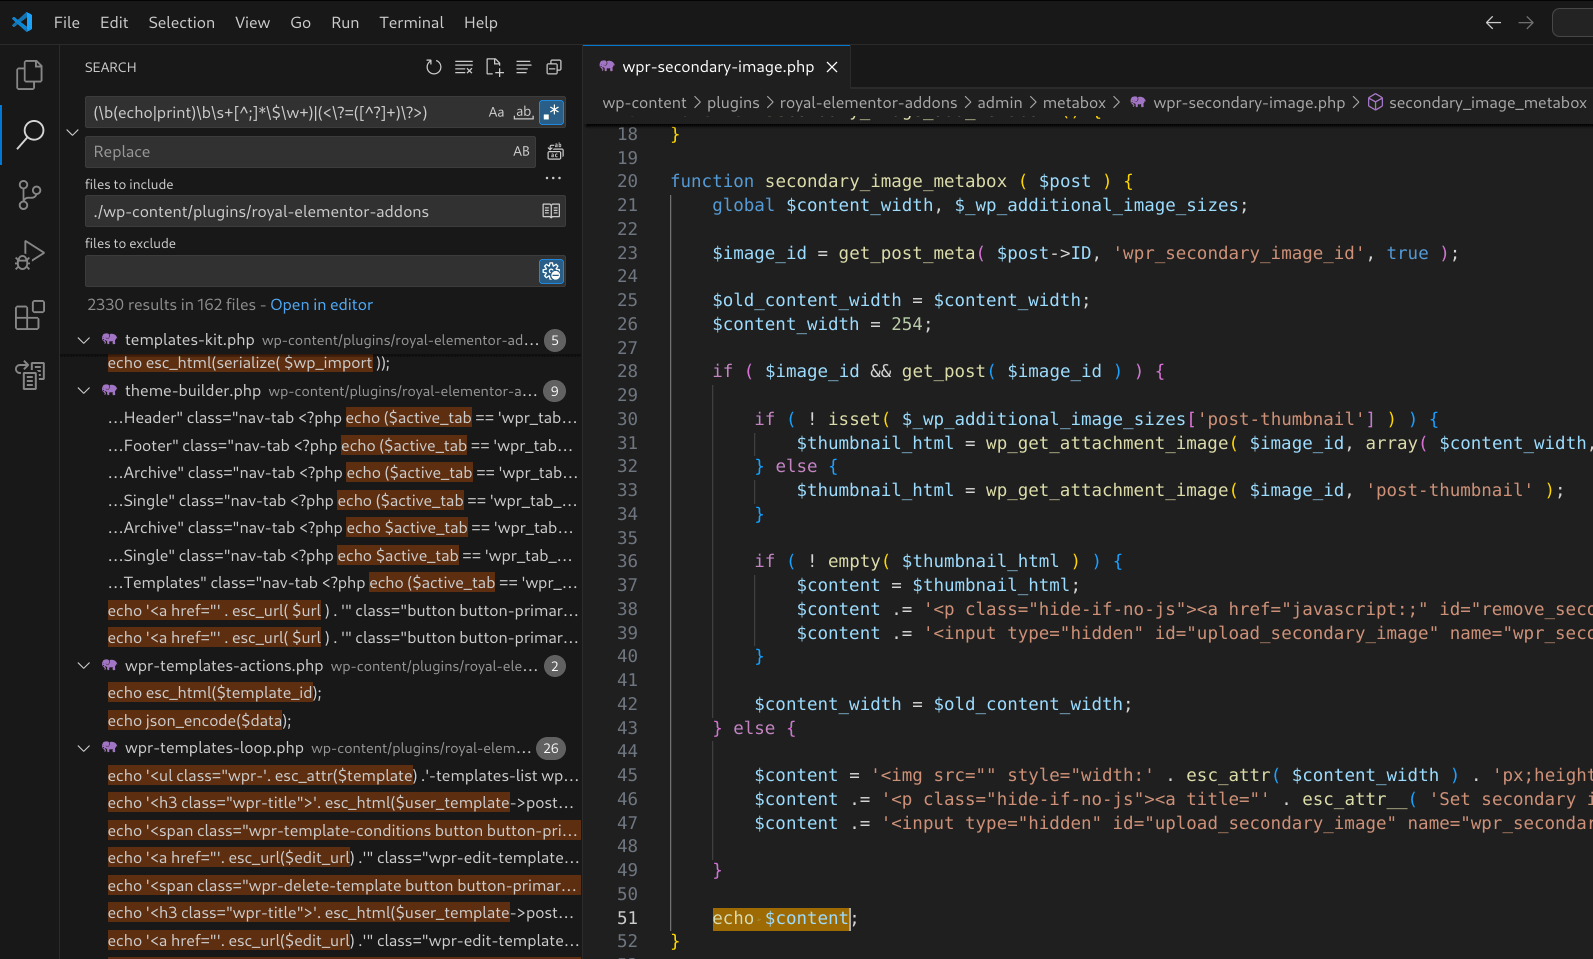
Built-in Grep / Search Tools
VSCode’s search includes a standard search feature, regex search, file inclusions and exclusions.
- Search within a specific plugin/theme: Right-click on the plugin or theme folder in wp-content/plugins or wp-content/themes and select “Find in Folder…“.
- Exclude non-PHP files: Use glob patterns like
*.js,*.css,*.md,*.txtin the files to exclude box to narrow down results. - Enable regex mode: Toggle the
.*icon in the search bar to use regular expressions. - Multiple search tabs: Click the
+icon in the search pane to run a new search without losing your previous one. Super useful when you’re juggling several leads at once.
PHPStorm
If you’re using PHPStorm, you’ve already got some features that go beyond what VSCode offers by default.
String Search, Regex, and Structural Search
Just like VSCode, PHPStorm has a project-wide string search and regular expression (regex) search feature built in.
Unlike VSCode, PHPStorm has a neat feature called “Structural Search and Replace (SSR)”. This is like grep, but instead of searching for a specific code pattern, it searches for a code structure pattern. For example, you can search for patterns like “function calls that use unsanitized $_POST input” using smart templates. It’s incredibly powerful once you learn how to use it.
The following is an example SSR query that searches for unsanitized $_POST input passed to a function:
$FUNC$($_POST['$KEY$'])
You can create an SSR search template by going to Edit -> Find -> Search Structurally.
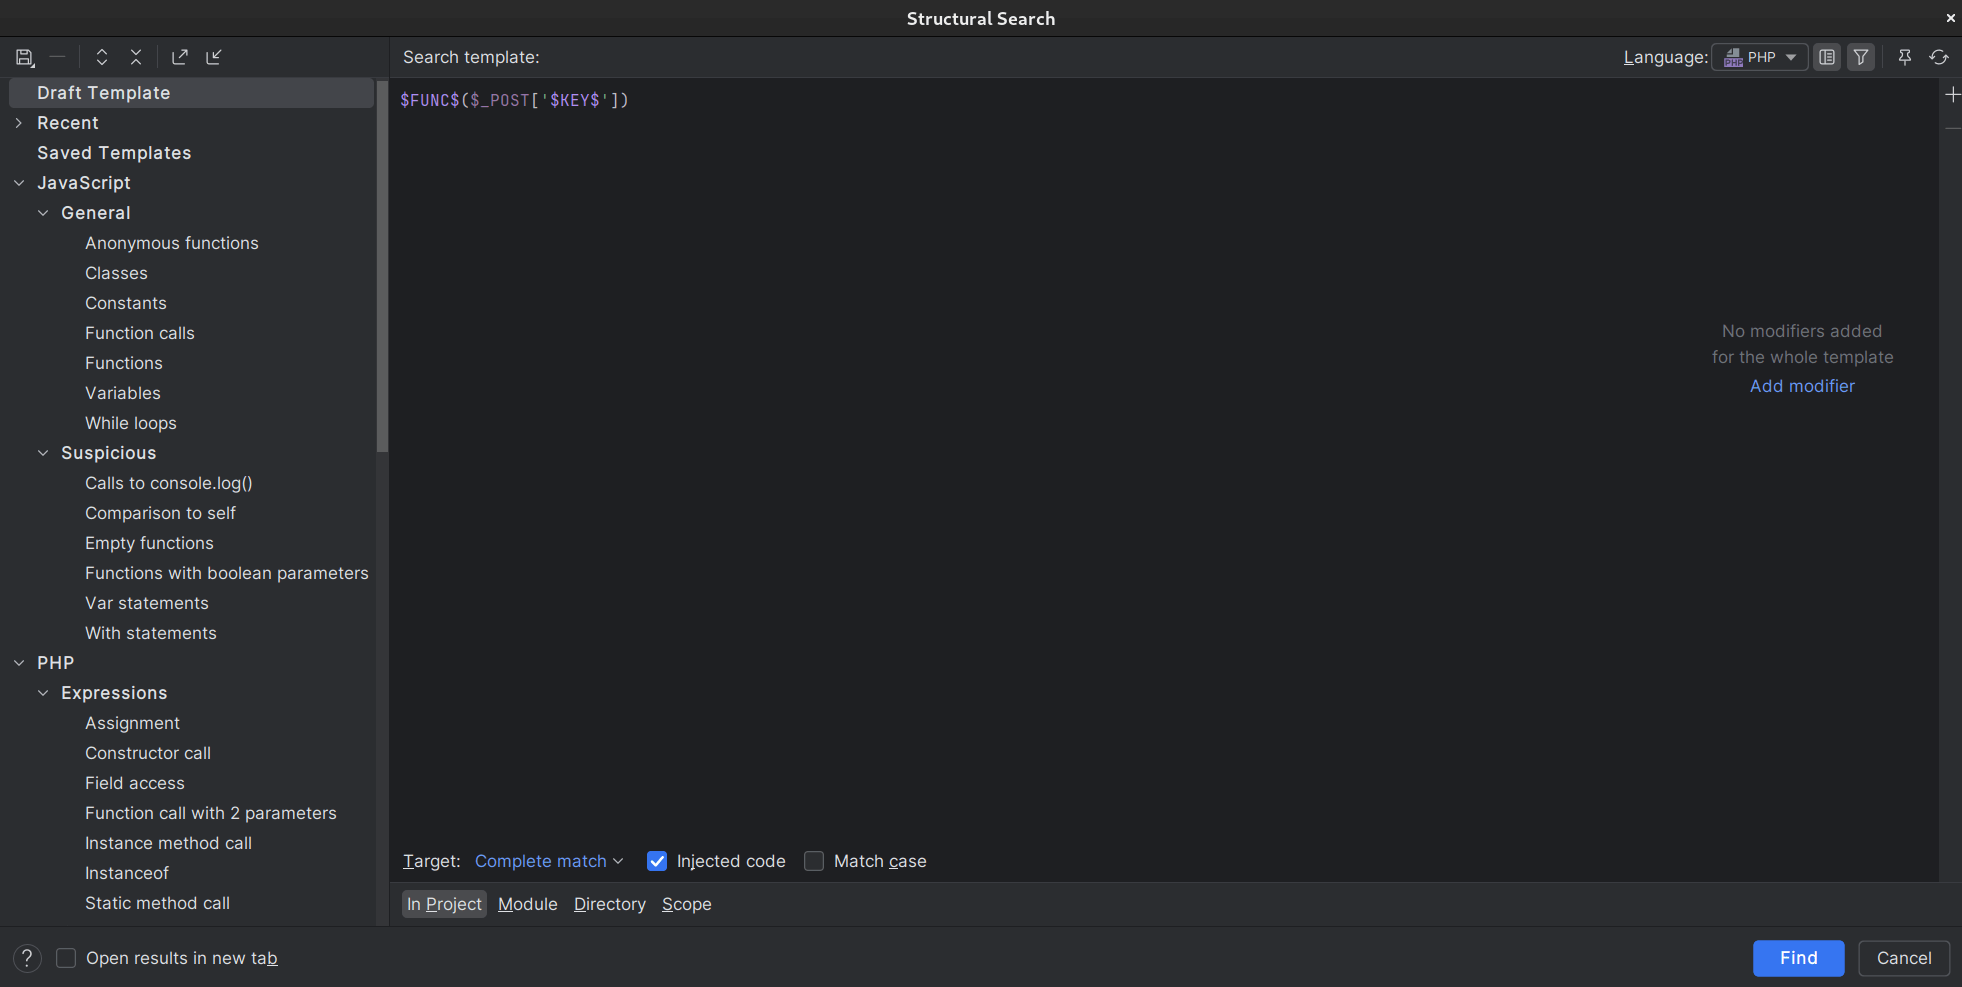
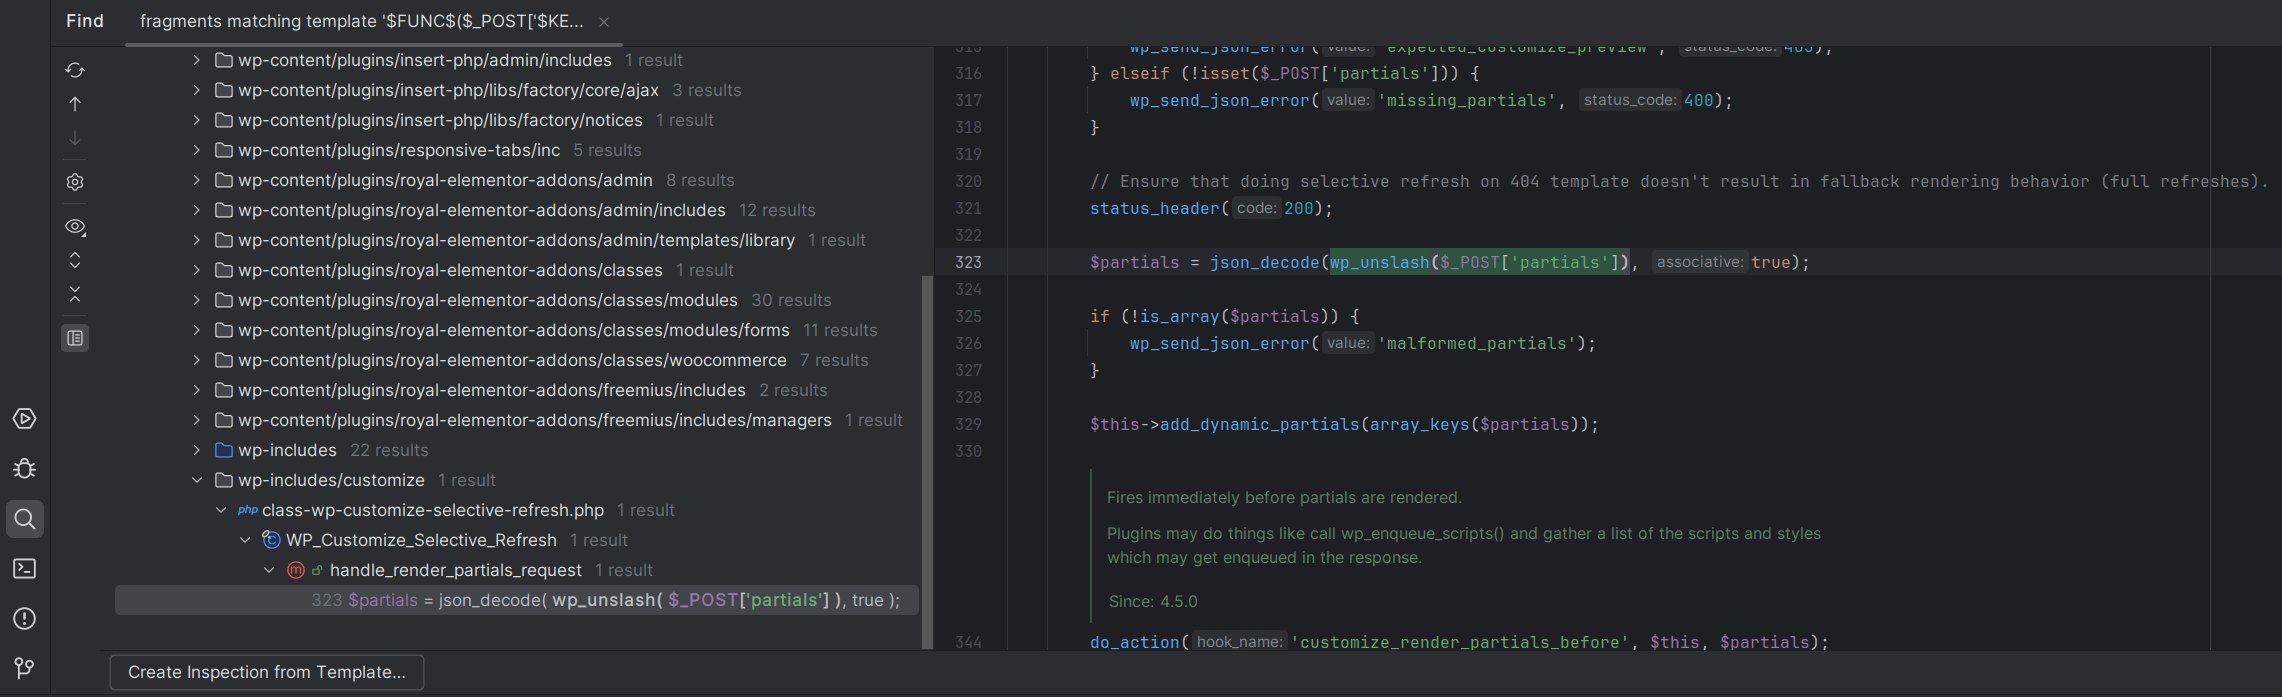
SSR templates can be handy for searching for certain code structures that use sources or sinks across several plugins or themes.
Find Usages / Call Hierarchy / Navigate to Symbol
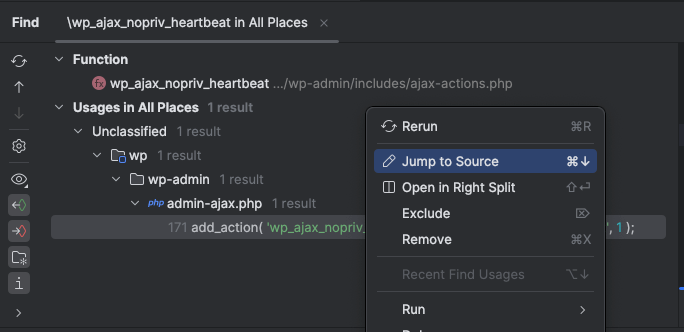
Right-click any function or method and select “Find Usages” to see every location it’s used.

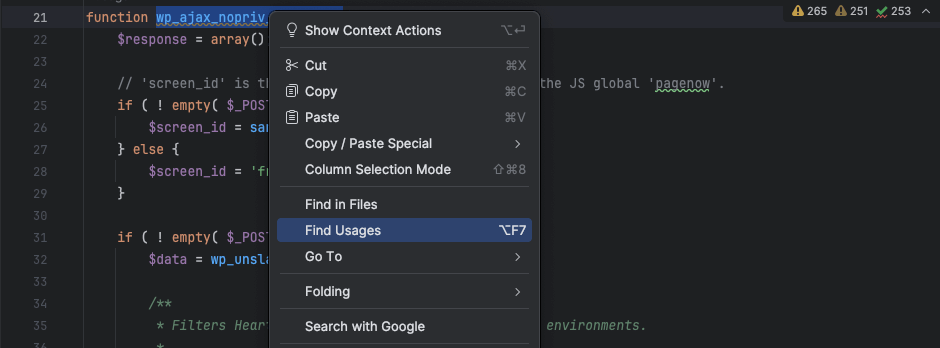
The call hierarchy can be expanded upward or downward — useful when you want to know who calls this function or what this function calls next.
In the navigation hierarchy, right clicking the function or action will give you the option to jump straight to the source. If you find a vulnerable function, or potentially vulnerable hook, you can quickly jump to the corresponding hook/function for further investigation.
Find in Files
Right-clicking a function and choosing “Find in Files” will display a list of files in which this function exists.


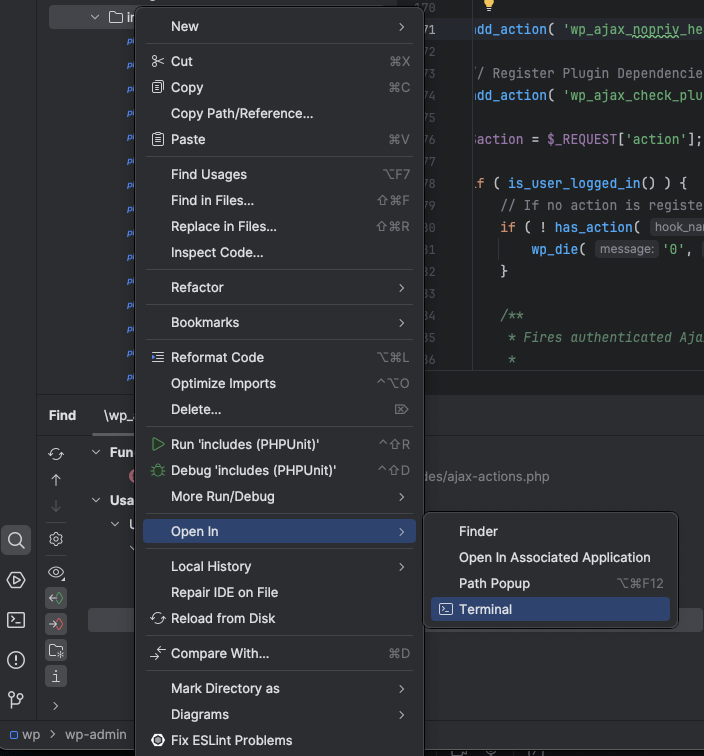
Open Folder in Terminal
- The “Open Folder in Terminal” feature provides a simple but useful option for those who like to grep, or perform actions, directly in a directory (such as a plugin or theme).
- Right-click any directory you’re interested in from the “Project” sidebar, and click “Open In” and choose “Terminal”. This will open a new terminal window in PHPStorm that you can perform your own searches in.
Obtaining Older Versions of Plugins and Themes
Whether you’re new to vulnerability research, or you’re a veteran, when conducting research, you may want to test an older version of a plugin or theme — either to reproduce a known vulnerability, look for patch bypasses, or compare how something changed across versions.
There are a few ways to get access to previous versions.
WP Rollback Plugin
WP Rollback is a simple way to downgrade plugins and themes directly from the WordPress admin interface.
To use it:
- Install and activate WP Rollback from the Plugins menu.
- Go to the Plugins page.
- You’ll see a new “Rollback” link next to each plugin.
- Click it, and you’ll get a list of all available versions from the WordPress.org repository.
- Select the version you want and roll back. Easy as that!
WP-CLI Commands
If you’re using WP-CLI in Docker, Local, or Devbox, you can programmatically install specific versions of plugins or themes.
Install a plugin via WP-CLI:
wp plugin install plugin-slug --version=1.2.3
To downgrade a plugin that’s already installed:
wp plugin install plugin-slug --version=1.2.2 --force
Activate a plugin:
wp plugin activate plugin-slug
Install a theme:
wp theme install theme-slug --version=2.0.0 --force
Plugin: https://wordpress.org/plugins/wp-rollback/
Theme: https://wordpress.org/themes/twentytwentyfive/
Downloading Older Versions Manually
If you need to get access to a specific plugin or theme in its zip archive format without installation, you can download them using the following scheme:
https://downloads.wordpress.org/plugin/[slug].[version].zip
https://downloads.wordpress.org/theme/[slug].[version].zip
Example:
https://downloads.wordpress.org/plugin/wp-rollback.2.0.7.zip
https://downloads.wordpress.org/theme/twentytwentyfive.1.1.zip
Curl:
curl -O https://downloads.wordpress.org/plugin/wp-rollback.2.0.7.zip
curl -O https://downloads.wordpress.org/theme/twentytwentyfive.1.1.zip
PowerShell:
Invoke-WebRequest -Uri "https://downloads.wordpress.org/plugin/wp-rollback.2.0.7.zip" -OutFile "wp-rollback.2.0.7.zip"
Invoke-WebRequest -Uri "https://downloads.wordpress.org/theme/twentytwentyfive.1.1.zip" -OutFile "twentytwentyfive.1.1.zip"
wget:
wget https://downloads.wordpress.org/plugin/wp-rollback.2.0.7.zip
wget https://downloads.wordpress.org/theme/twentytwentyfive.1.1.zip
SVN (Subversion):
svn checkout https://plugins.svn.wordpress.org/wp-rollback/tags/2.0.7/ wp-rollback-2.0.7
where wp-rollback-2.0.7 is the local directory name where the contents of the tag will be downloaded.
Setting Up WordPress User Accounts
When you stumble across a potential vulnerability, you will want to test them using lower privileged accounts.
To properly test across a range of permission levels, you’ll want to create one user for each of the main WordPress roles.
Suggested User Accounts
Here’s a simple suggested setup that covers all roles and are easily distinguishable when logged in:
- admin – Administrator
- user_editor – Editor
- user_author – Author
- user_contributor – Contributor
- user_subscriber – Subscriber
Or if you’d like a shorter set of options, you can use:
- admin – Administrator
- edit – Editor
- auth – Author
- con – Contributor
- sub – Subscriber
You can create and delete these accounts manually in the WordPress admin dashboard under Users -> Add New User (wp-admin/user-new.php), or with WP-CLI like this:
wp user create user_subscriber user_subscriber@example.com --role=subscriber --user_pass=password
wp user delete user_subscriber
Repeat for each role, changing the username, email, and role as needed.
Here is a Python script to create or delete users in bulk:
wp_users.py
#!/usr/bin/env python3
import argparse
import subprocess
import sys

# Define the list of users and their corresponding details
# Note: The admin user is not deleted even if --delete or --refresh is specified.
users = [
    {"username": "admin", "email": "admin@example.com", "role": "administrator", "password": "password"},
    {"username": "user_editor", "email": "user_editor@example.com", "role": "editor", "password": "password"},
    {"username": "user_author", "email": "user_author@example.com", "role": "author", "password": "password"},
    {"username": "user_contributor", "email": "user_contributor@example.com", "role": "contributor", "password": "password"},
    {"username": "user_subscriber", "email": "user_subscriber@example.com", "role": "subscriber", "password": "password"}
]

# WordPress installation directory
wordpress_root = "/var/www/html"

def create_wp_user(user):
    """Creates a WordPress user using WP-CLI."""
    command = [
        "wp", "user", "create",
        user["username"],
        user["email"],
        "--role=" + user["role"],
        "--user_pass=" + user["password"]
    ]
    try:
        result = subprocess.run(command, check=True, capture_output=True, text=True, cwd=wordpress_root)
        print(f"User '{user['username']}' created successfully.")
        print(result.stdout)
    except subprocess.CalledProcessError as e:
        print(f"Error creating user '{user['username']}':")
        print(e.stderr)

def delete_wp_user(user):
    """Deletes a WordPress user using WP-CLI (skips admin)."""
    if user["username"] == "admin":
        return  # Do not delete the admin user.
    command = [
        "wp", "user", "delete", user["username"],
        "--yes"
    ]
    try:
        result = subprocess.run(command, check=True, capture_output=True, text=True, cwd=wordpress_root)
        print(f"User '{user['username']}' deleted successfully.")
        print(result.stdout)
    except subprocess.CalledProcessError as e:
        print(f"Error deleting user '{user['username']}':")
        print(e.stderr)

def main():
    parser = argparse.ArgumentParser(description="Automate WordPress user creation via WP-CLI.")
    parser.add_argument("--delete", action="store_true", help="Delete current users with matching names (except admin).")
    parser.add_argument("--refresh", action="store_true", help="Replace current users with new default ones (implies deletion, except admin).")
    args = parser.parse_args()

    # If either --delete or --refresh is specified, delete existing matching users (except admin)
    if args.delete or args.refresh:
        for user in users:
            delete_wp_user(user)
        if args.delete and not args.refresh:
            print("Deletion completed. Exiting as --delete was specified without --refresh.")
            sys.exit(0)

    # Create users for:
    # - Normal run (no flags)
    # - --refresh mode (after deletion, re-create users)
    for user in users:
        create_wp_user(user)

if __name__ == "__main__":
    main()
To just create the users run the script without any flags:
python3 wp_users.py
To delete the users (except admin) without re-creating them:
python3 wp_users.py --delete
To refresh users (delete then re-create):
python3 wp_users.py --refresh
Check out the User Roles table in the WordPress Security Architecture blog post to get a better understanding of which capabilities each default role has.
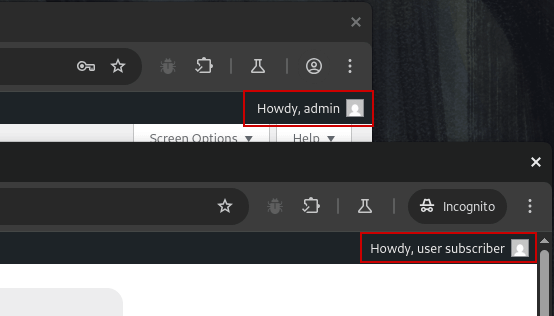
Testing Across Roles
Keeping your main browser logged in as admin, and opening an incognito or private browsing window to log in as whichever lower-privileged user you need to test with makes it easy to test vulnerabilities and compare behavior across roles without having to frequently log out and back in again. You can also use separate browser profiles or containers for session isolation.
This can be especially useful in Burp Suite (which we talk about in the next section), allowing you to utilize two separate sets of cookies when using the “Repeater” functionality for testing.
Web Application Security Testing Tools
Testing for vulnerabilities will require analyzing, intercepting, modifying, and replaying requests. This can be done with browser dev tools, but this method lacks efficiency and has limitations. There are two main web application security testing tools that are relevant to WordPress vulnerability testing: Burp Suite and Caido. These tools work by proxying requests from the browser, and then provide a number of features to help efficiently test for potential vulnerabilities. Web Proxy tools such as Burp Suite and Caido can be considered the swiss army knife of web application security testing. We consider either of these security testing tools as the only essential tool you need to master for web application security research.
Burp Suite
While Burp Suite comes with an enormous number of features, you will only need a small subset of these features for 90% of vulnerability testing with WordPress.
- Proxy
- HTTP History
- Intercept
Basic Setup
- Download Burp Suite Community Edition and install it.
- Open Burp Suite and modify the default proxy interception state
- Settings (top right hand corner)
- Tools -> Proxy
- Select Disable interception under Default proxy interception state
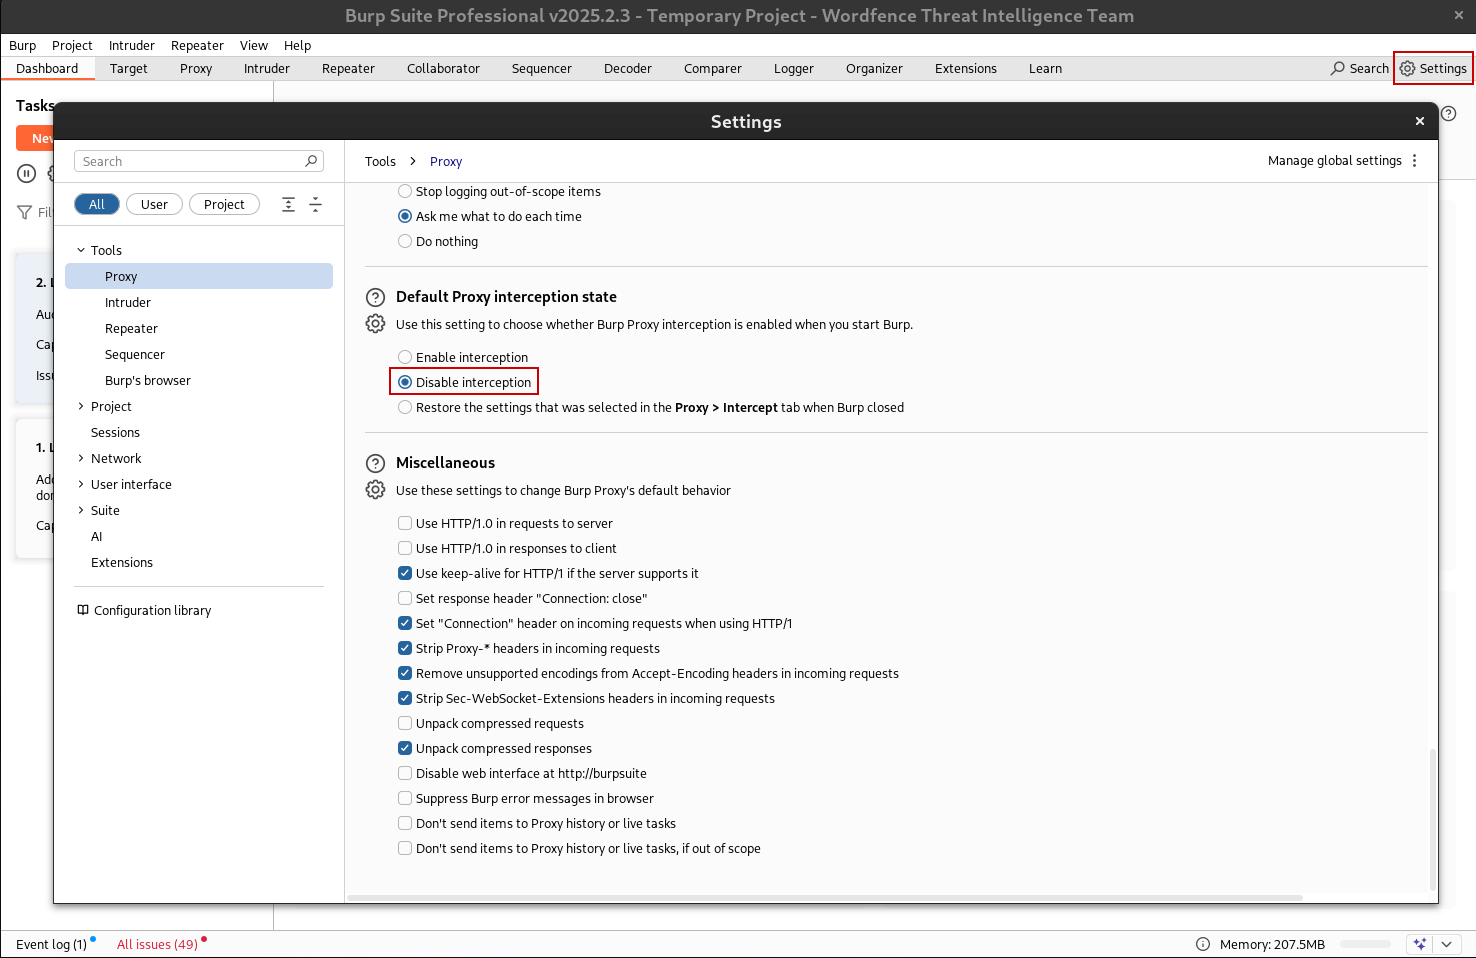
Disabling default interception means that requests from your browser will be passed through the proxy and logged in HTTP history, but not intercepted by default, allowing you to make the decision on whether a request needs to be intercepted.
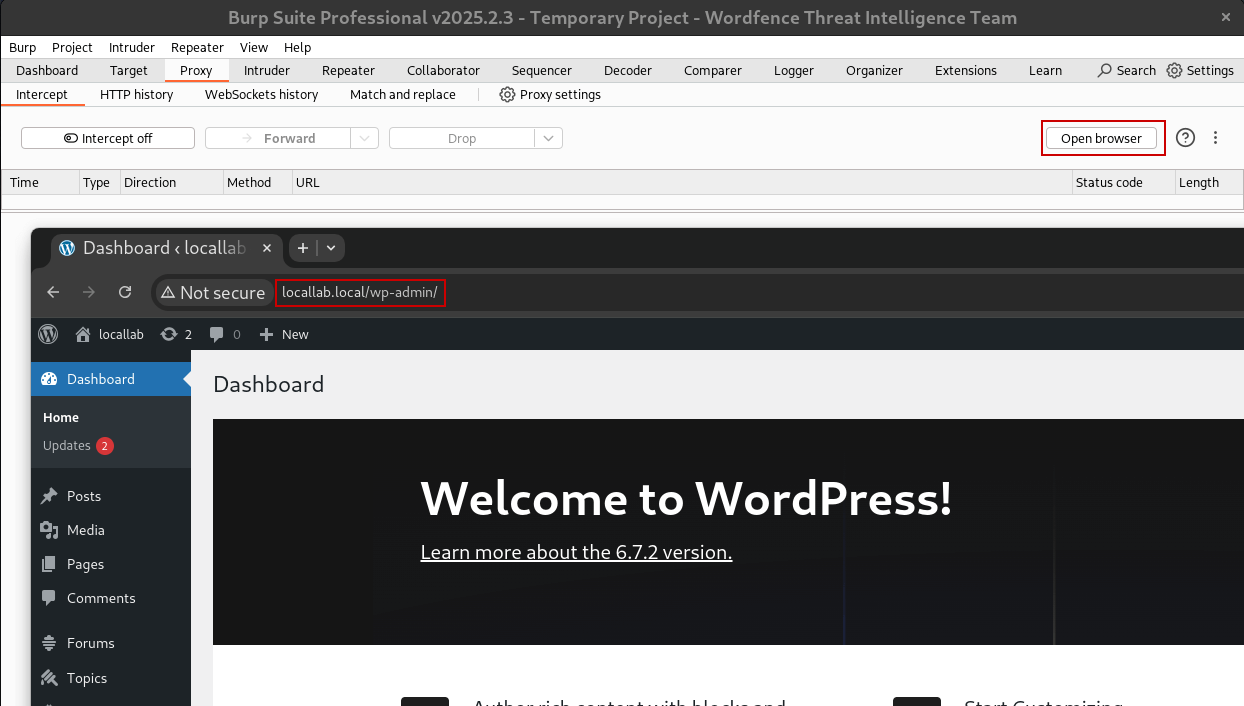
Burp Browser
Using the Burp Browser (a customized Chromium browser) is the easiest way to interact with WordPress and Burp Suite as all requests will automatically be passed through its proxy. It eliminates the need to mess with certificates for TLS/SSL sites, browser proxy extensions, isolation from normal web browsing, and custom browser configurations.
- Navigate to the Proxy tab -> Intercept
- Click Open Browser
If you prefer to use another browser, you can route requests to the Burp proxy by configuring the browsers proxy setting to route requests through 127.0.0.1 port 8080. Since most people use their browsers for normal web browsing, it’s easier to use a browser plugin like FoxyProxy so you can easily enable and disable the proxy with the click of a button, or use a separate browser profile.
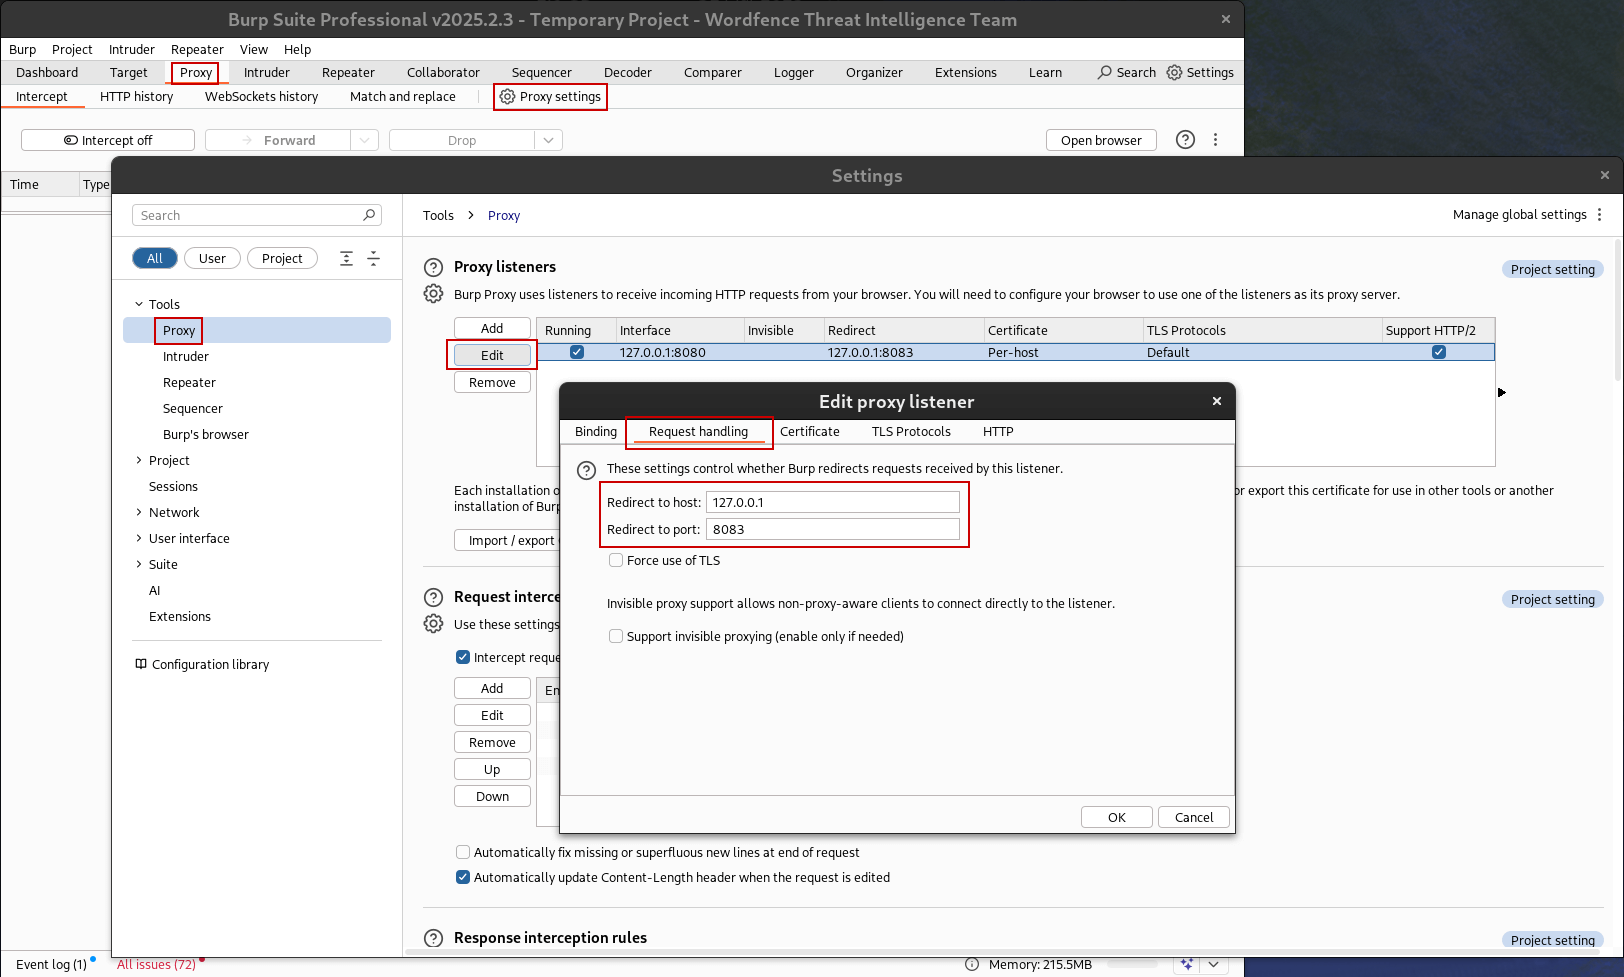
Burp Browser “No Response Received From Remote Server” Error
You may receive a “No Response Received From Remote Server” error when sending requests from the Burp Browser. This error may happen often enough that it disrupts your workflow.

This error can be mitigated by redirecting Burp’s proxy listener through mitmdump, the command-line version of mitmproxy.
- Install mitmproxy from https://mitmproxy.org/
- The package, mitmproxy, comes with the binary
mitmdump
./mitmdump --mode regular@<port>- For example
./mitmdump --mode regular@8083

- Proxy (tab) -> Proxy Settings
- Select the existing proxy listener for 127.0.0.1:8080 under Proxy listeners
- Edit -> Request Handling tab
- Redirect to host: 127.0.0.1
- Redirect to port: 8083
Basic Usage
Once you’ve got Burp Suite set up and requests are flowing through the proxy (either via the Burp browser or your own with proxy settings), you’ll want to familiarize yourself with some basic features that are relevant to WordPress vulnerability testing.
Proxy
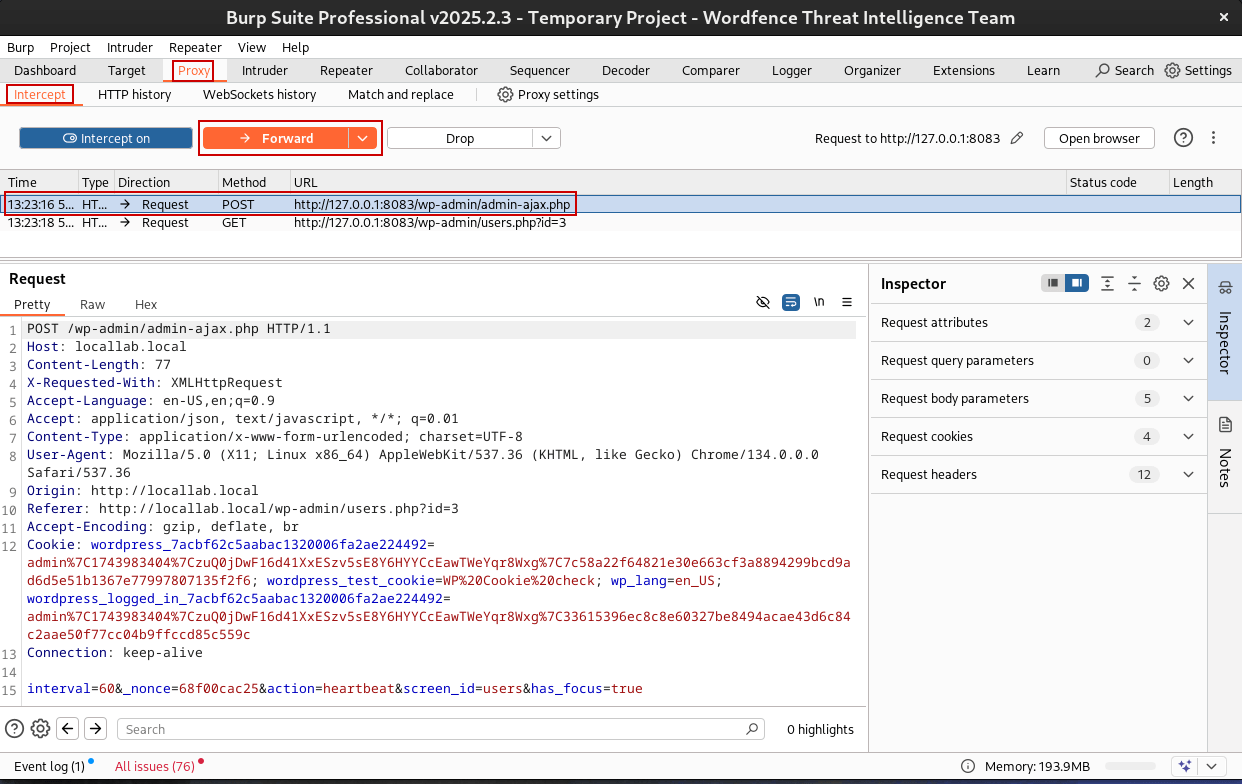
HTTP History
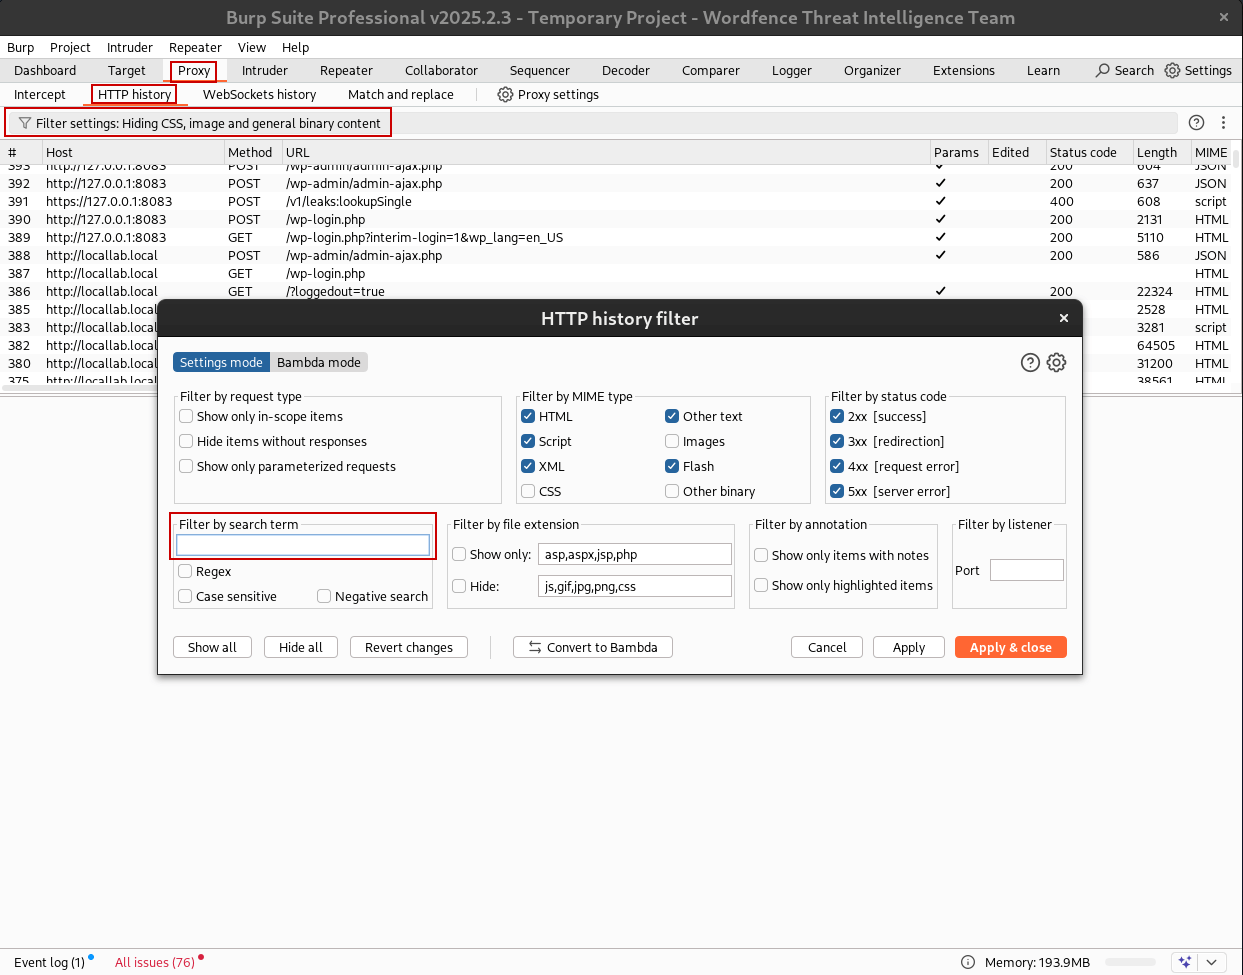
All HTTP and HTTPS requests sent through Burp are automatically logged under Proxy -> HTTP history.
- Click on any request to view full request/response details.
- You can filter by method (e.g., GET, POST), status code, MIME type, or keyword using the filter bar.
- This is useful for spotting how plugins are sending requests during dynamic analysis.
Intercept
You can toggle intercept on or off by going to Proxy -> Intercept and pressing the Intercept off/on button.
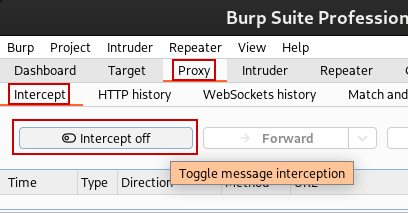
- When Intercept is on, requests will pause before reaching the server.
- You can modify parameters, headers, or cookies before forwarding the request.
- Click “Forward” to send the modified request, or “Drop” to block it.
Intercept is specifically designed to pause requests so you can view and modify them before forwarding them, or for sending them to Repeater for modification and replay.
Repeater
Repeater is your go-to for manual testing.
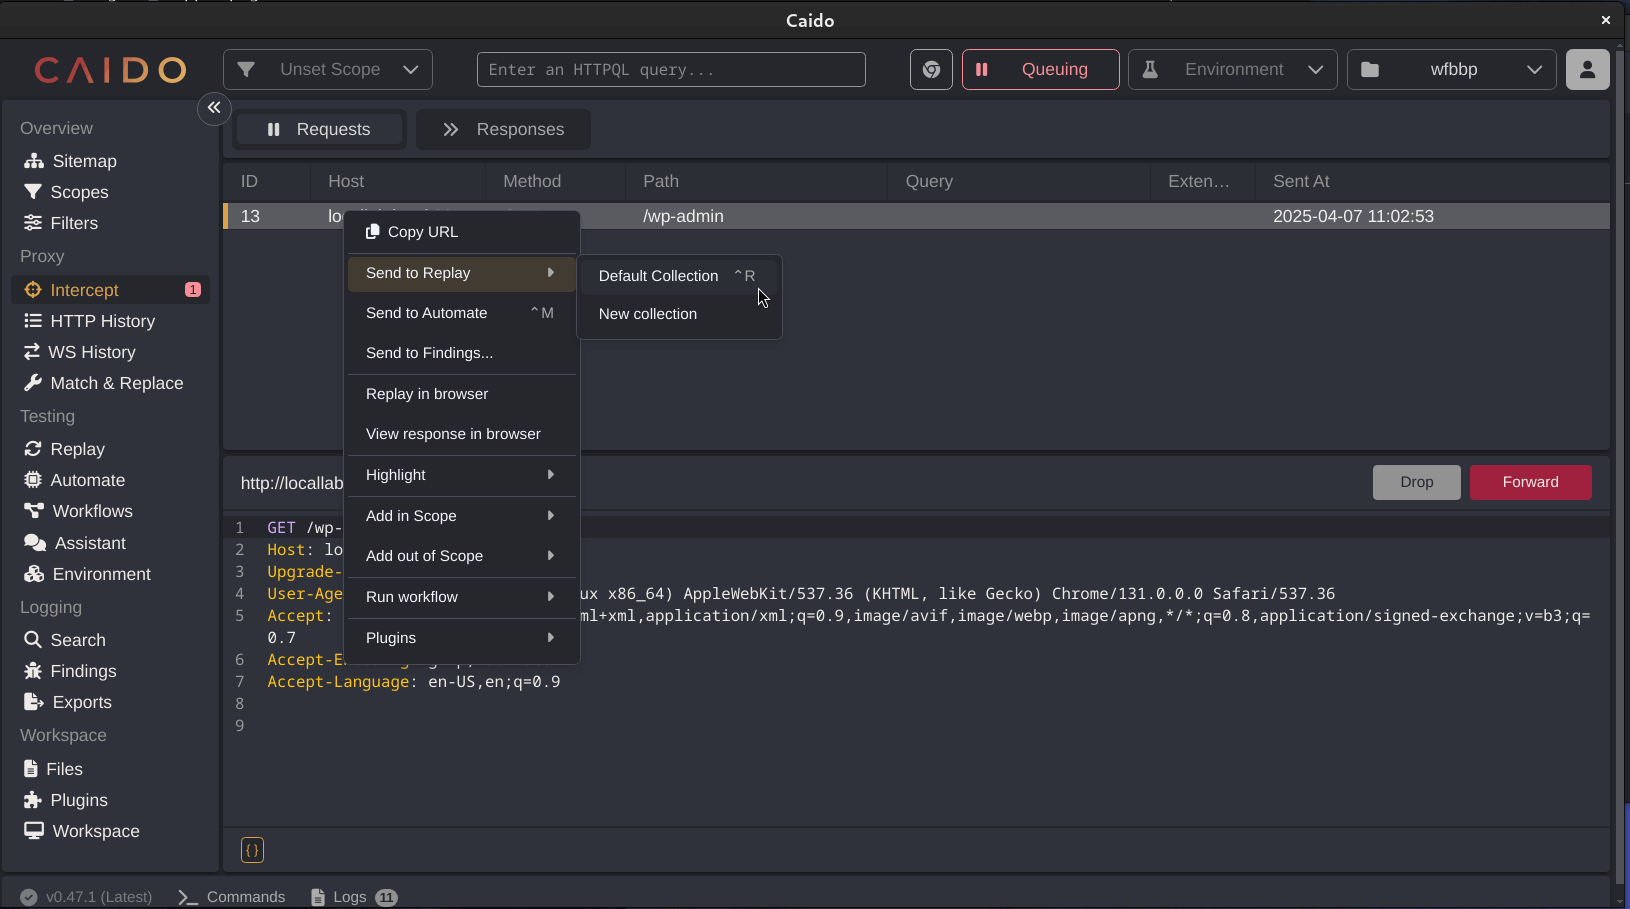
- In HTTP History or Intercept, right-click any request and choose “Send to Repeater.”
- Switch to the Repeater tab to edit and resend the request.
Decoding URL and base64 Encoded Content
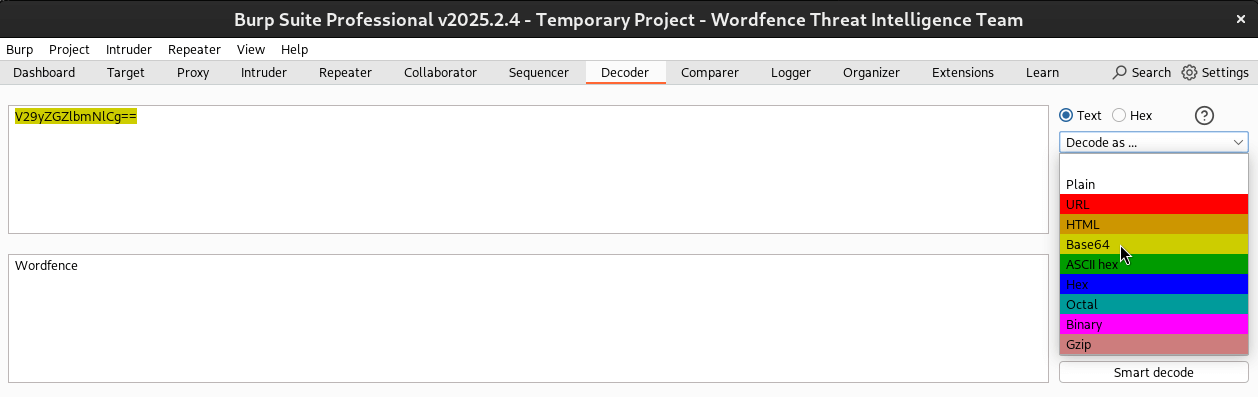
Burp Suite provides automatic decoding of URL and base64 encoded content (amongst others). For example, highlighting a value will cause Burp to show the decoded value in the side pane.
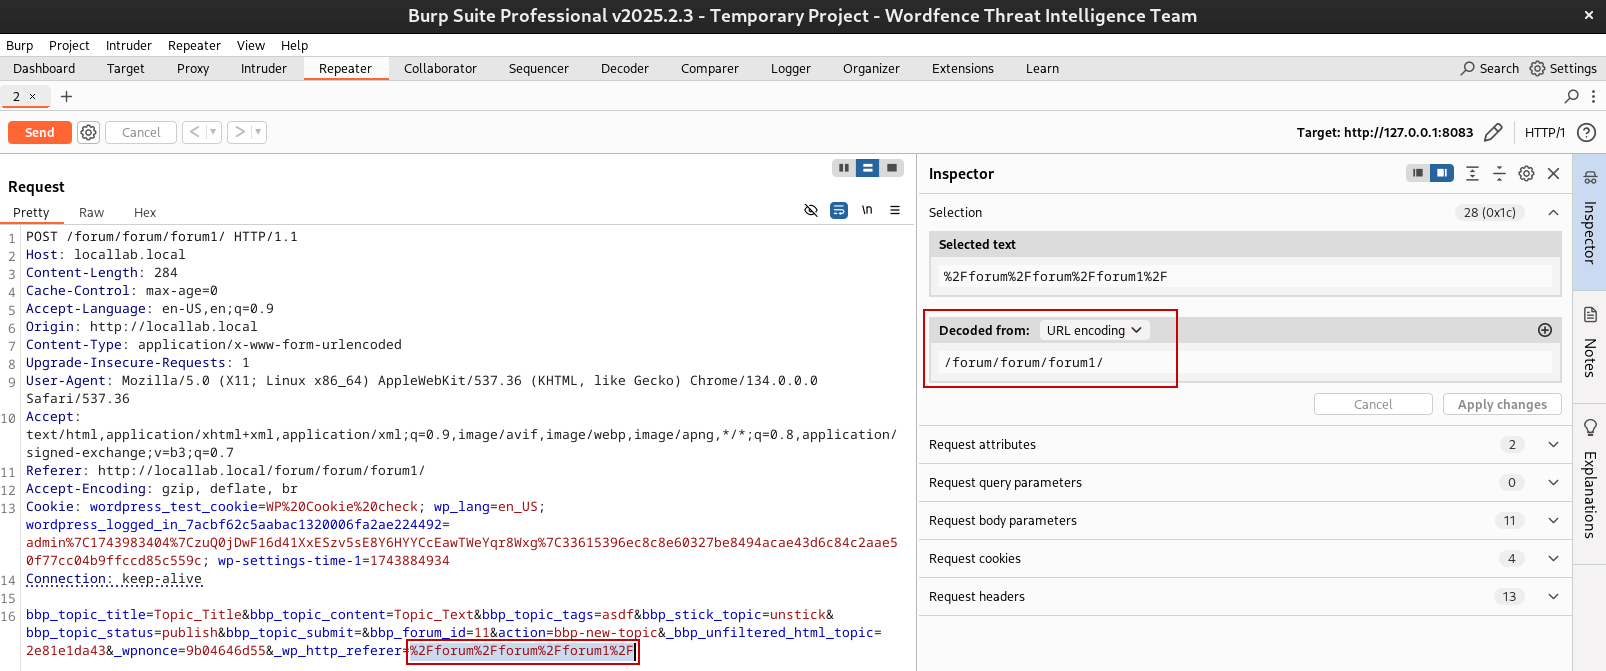
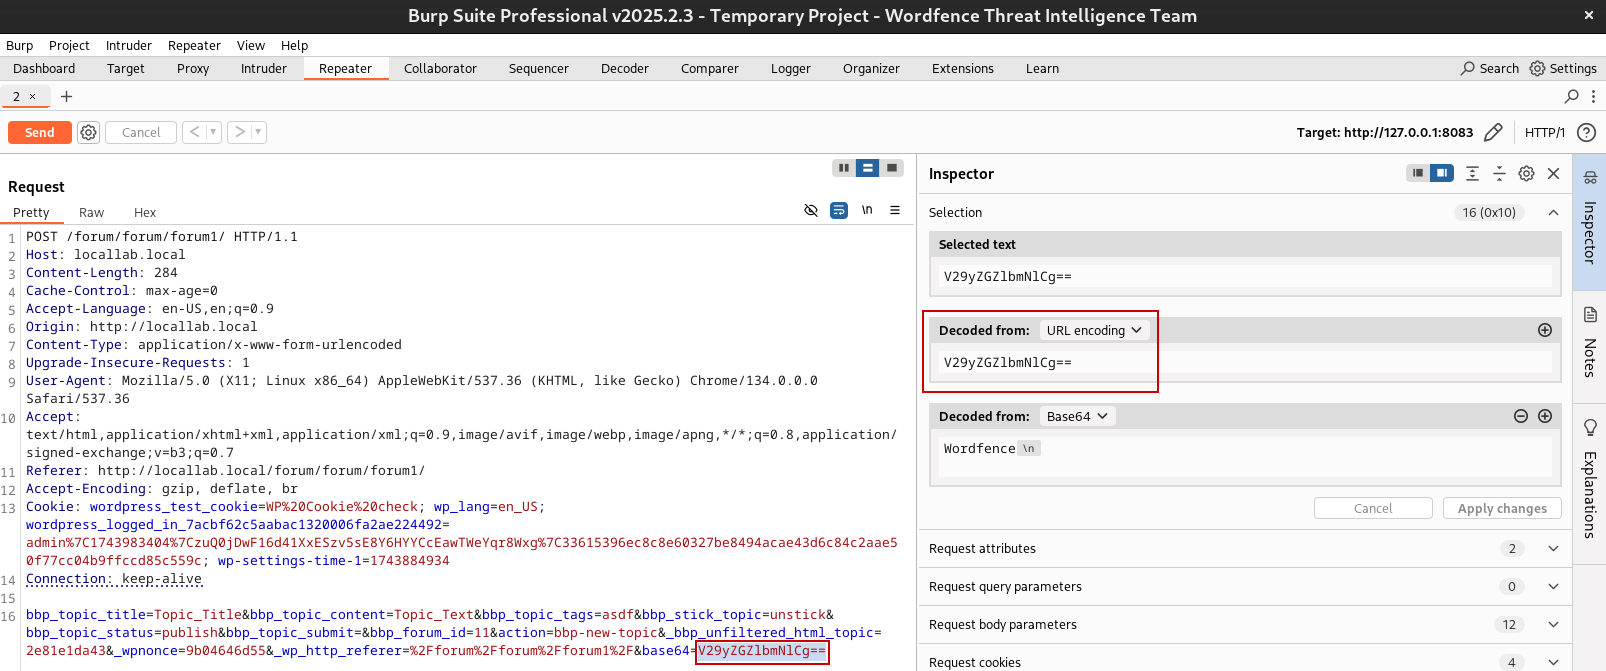
This is incredibly useful for modifying encoded payloads to properly test a vulnerability. This encoding and decoding can also be performed in the `Decoder` tab for the ability to decode and re-endcode payloads as needed.
Caido
Much like Burp Suite, Caido is a web application security testing application. However, its feature set is less broad and more focused with a user interface that is a bit more intuitive to use than Burp Suite. Given the limited set of features needed for the vast majority of WordPress vulnerability testing, Caido provides everything you need in a lightweight package.
Basic Setup
- Download Caido: https://caido.io/download
- Install and launch Caido. It’s available as a standalone desktop app. It’s also available as a command-line application.
- Follow the in-app instructions to create a Caido account.
- Follow the in-app instructions to install the Caido certificate in your browser of choice.
- Follow the in-app instructions to configure your browser’s proxy (Caido defaults to listening on port 8080) or set up the FoxyProxy browser add-on for quick switching.
- Follow the in-app tutorial to get an understanding of how the Caido application is laid out.
Basic Usage
Proxy
HTTP History
Similar to Burp Suite, all proxied HTTP requests will appear in Proxy -> HTTP History.
- Click any request to view full request and response details.
- Filtering is done using Caido’s proprietary “HTTPQL” syntax. For example, if we wanted to filter by a keyword in the hostname, we could use the HTTPQL syntax
req.host.cont:"<keyword>".

Intercept
Request interception is the same as Burp Suite, but the setting is different. By default, Caido is in a forwarding state. This means requests will be passed from the browser, through the proxy, to the server. Clicking on the Forwarding button will place the proxy into a Queuing state, which is the same as the Intercept state of Burp Suite.
To intercept a request:
- Click “Forwarding” in the top bar. The button will change to “Queueing”.
- Requests will pause and appear in Proxy -> Intercept before reaching the server.
- You can now edit the request (e.g. headers, parameters, cookies, POST body, etc.).
- Click “Forward” to forward the request, or “Drop” to cancel it.


Replay
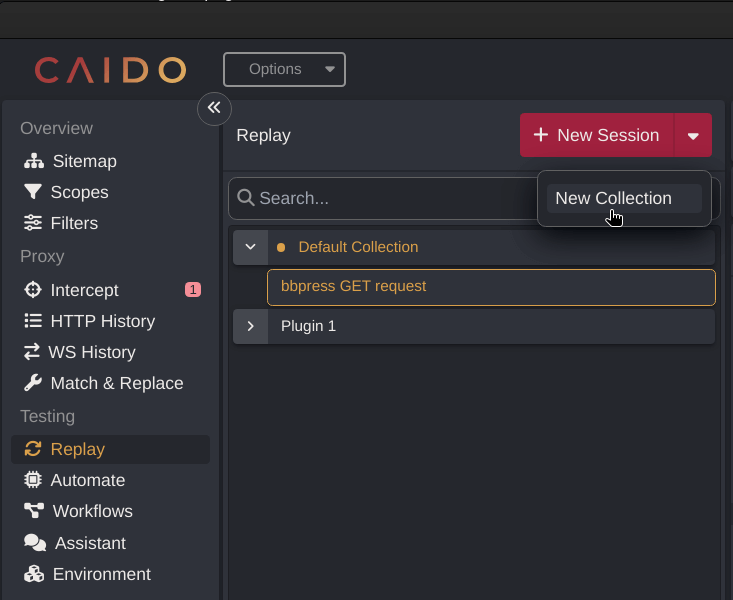
The Replay feature (under Testing -> Replay) is roughly the same as Burp Suite’s Repeater. Similar to Burp Suite, you can right-click any request (n HTTP History or Intercept and choose “Send to Replay”. The Replay feature uses “collections” for organizing requests for testing. You can send requests to the default collection or create a new collection from the Testing -> Replay area of the application.
WP Directory: Searching for Vulnerable Code
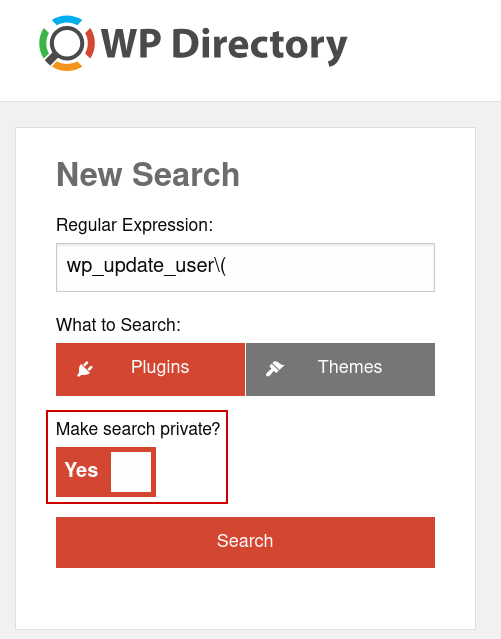
WP Directory is a search engine that indexes every plugin and theme in the WordPress.org repository. It’s an invaluable tool for vulnerability researchers who want to search for certain code patterns in WordPress plugins or themes without downloading, extracting, and grepping plugin or theme files.
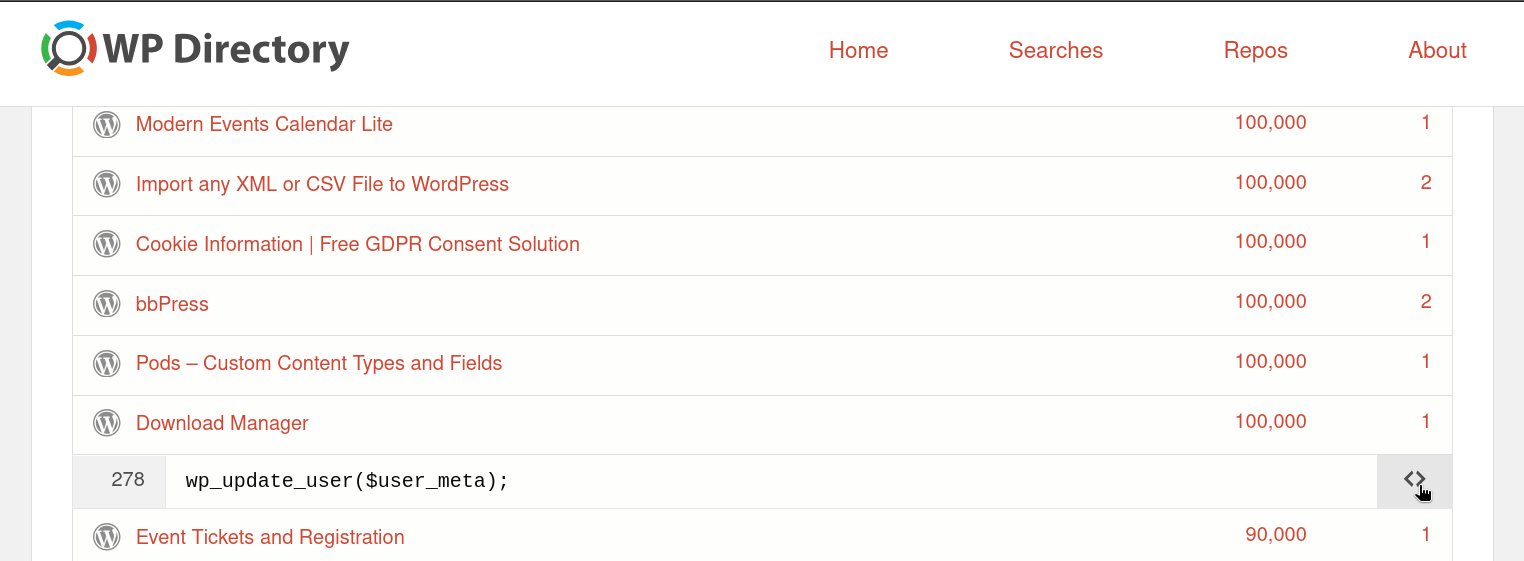
WP Directory’s search requires a regular expression to match the code pattern you’re looking for. For example, you might do a search for common sinks like wp_update_user(). We recommend also making the search private by clicking the Make search private? toggle.
WP Directory will then take a few moments to perform the search and display matches found in plugin or theme code.

When the search is complete, a list of plugins or themes containing one or more matches will be displayed.

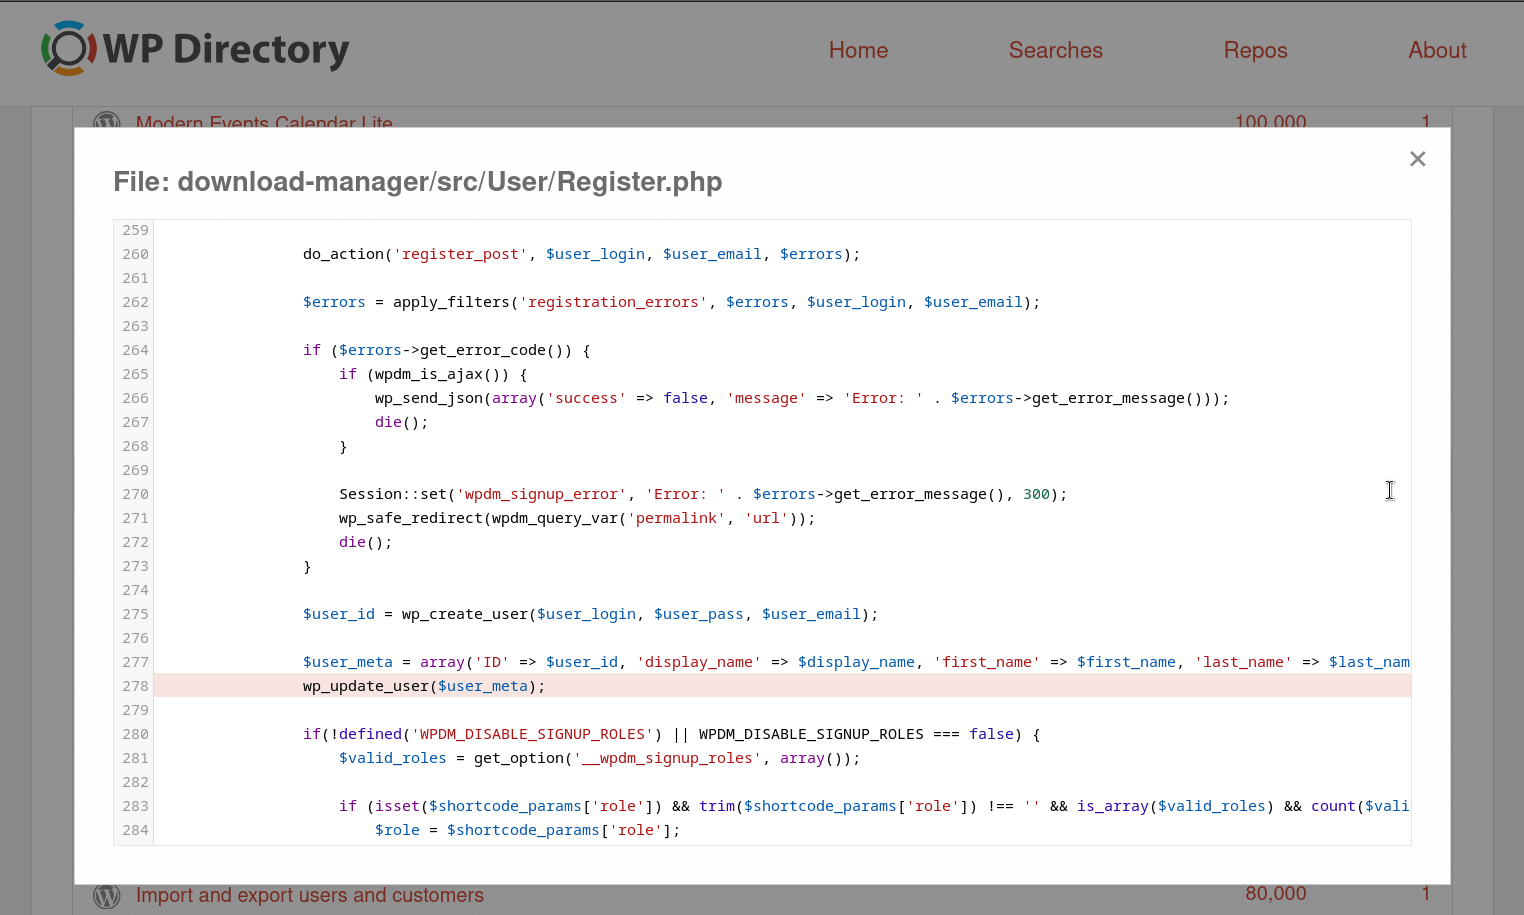
Clicking on the row of one of these matches will expand it, showing the line of code that was matched.
Clicking on the for a given match will provide a contextual view of the matched line within the plugin or theme code.
It’s important to understand that WP Directory’s indexed information may be behind what is live in the WordPress plugin or theme repository. If you find something interesting in WP Directory, you will want to download the plugin or theme and verify this code is still as it appears in WP Directory.
Additionally, WP Directory can only perform a single-line regular expression match. This means it’s useful as a tool to narrow your focus if you’re searching for a specific pattern, but because that pattern is found, it does not necessarily imply that a vulnerability exists. This is where your research and testing will come into play.
Additional Tools and Resources
Once your WordPress lab is set up, there are a few more tools that can make your research faster, easier, and more effective. These range from code search utilities to vulnerability-specific testing tools.
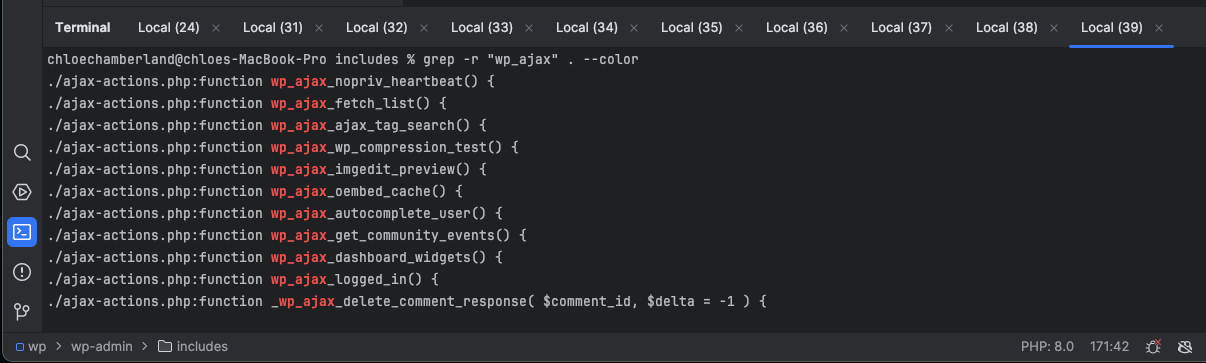
Grep and Ripgrep for Searching Code
Sometimes, the fastest way to track down a potential vulnerable pattern, especially across multiple plugins, is with a terminal-based search tool.
Grep (grep) is a tool that is built-in and available on most operating systems. Ripgrep (rg) is a faster and more featureful alternative.
These tools can be used with regular expressions to find patterns within one or more files in WordPress plugins or themes.
For example, you can use Ripgrep to find where add_action() was used in the PHP files of all installed plugins:
rg --type php 'add_action(' wp-content/plugins/

Diff Tools
Diff tools can be used to track changes between software versions and identify vulnerabilities that may stem from untested new features or incorrect/incomplete patches for other vulnerabilities.
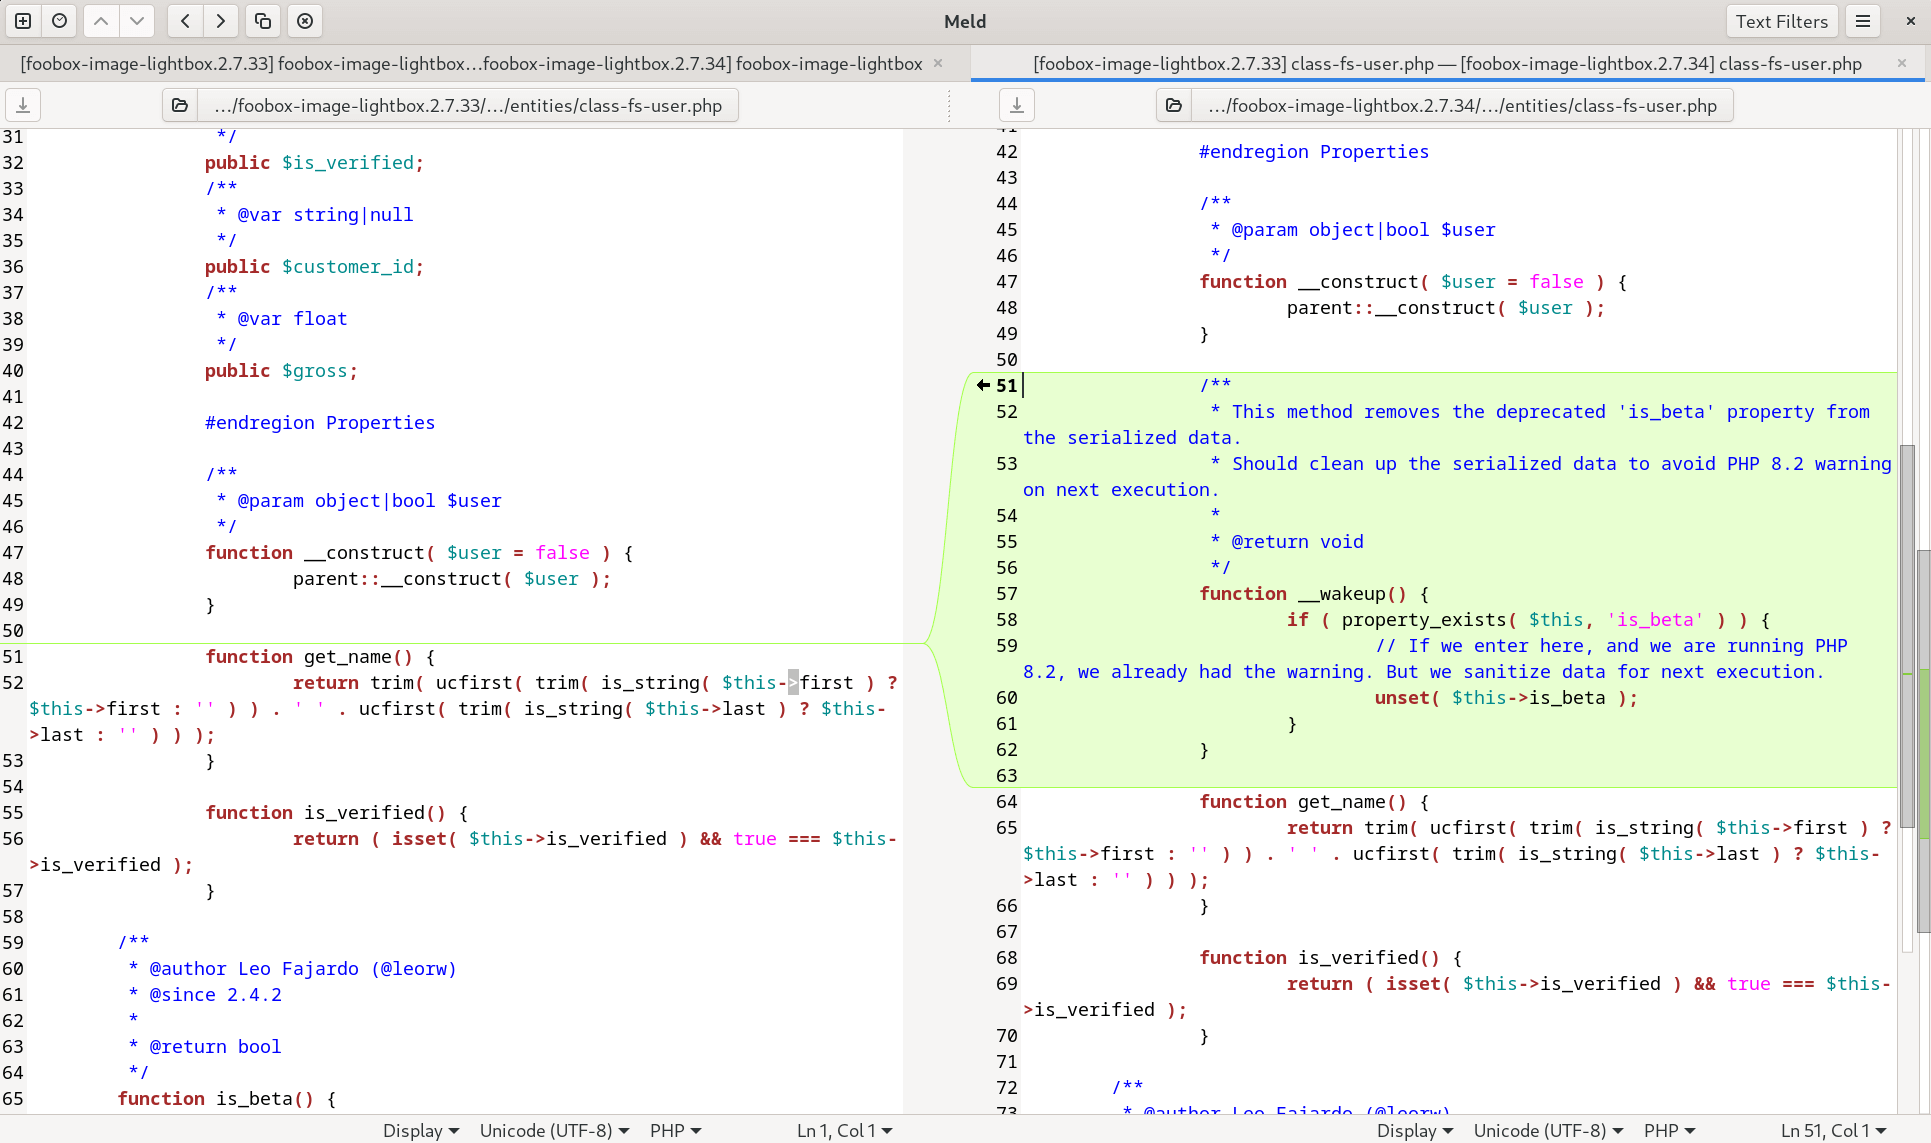
Meld
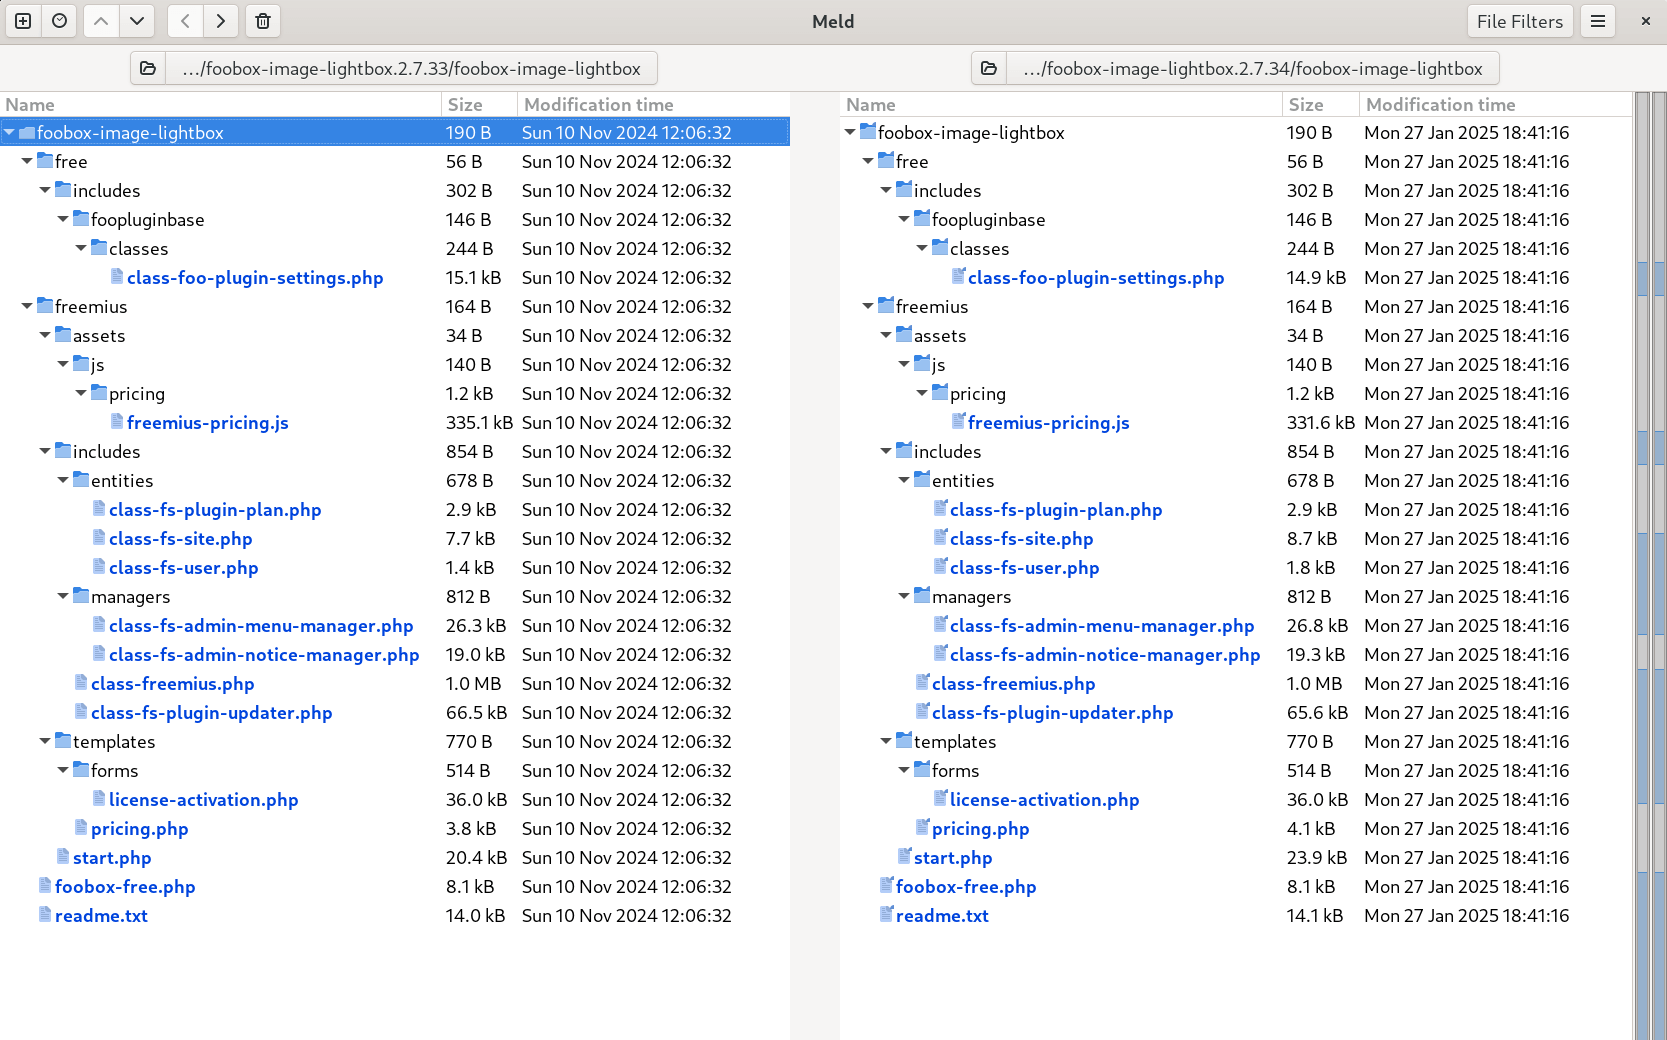
Meld is a visual diff and merge tool that allows you to compare two files or directories side-by-side. Its syntax highlighting makes it easy to spot modifications and potential vulnerabilities between different versions of plugins and themes.
You can download Meld from its official website (source, Windows MSI), install it through your package manager or Flathub (Linux), or via Homebrew (Mac):
To use Meld, simply launch the program, select the files or directories you wish to compare, and examine the differences interactively.
Colordiff
colordiff is a command-line tool that adds syntax highlighting and colorization to the output of the traditional diff command, making it much easier to spot changes between files when working in a terminal.
While it doesn’t offer a graphical interface like Meld, it’s a great option when you’re, for example, SSH’d into a remote machine or just prefer using the terminal. It highlights additions, deletions, and context lines using customizable color schemes.
colordiff file1.php file2.php
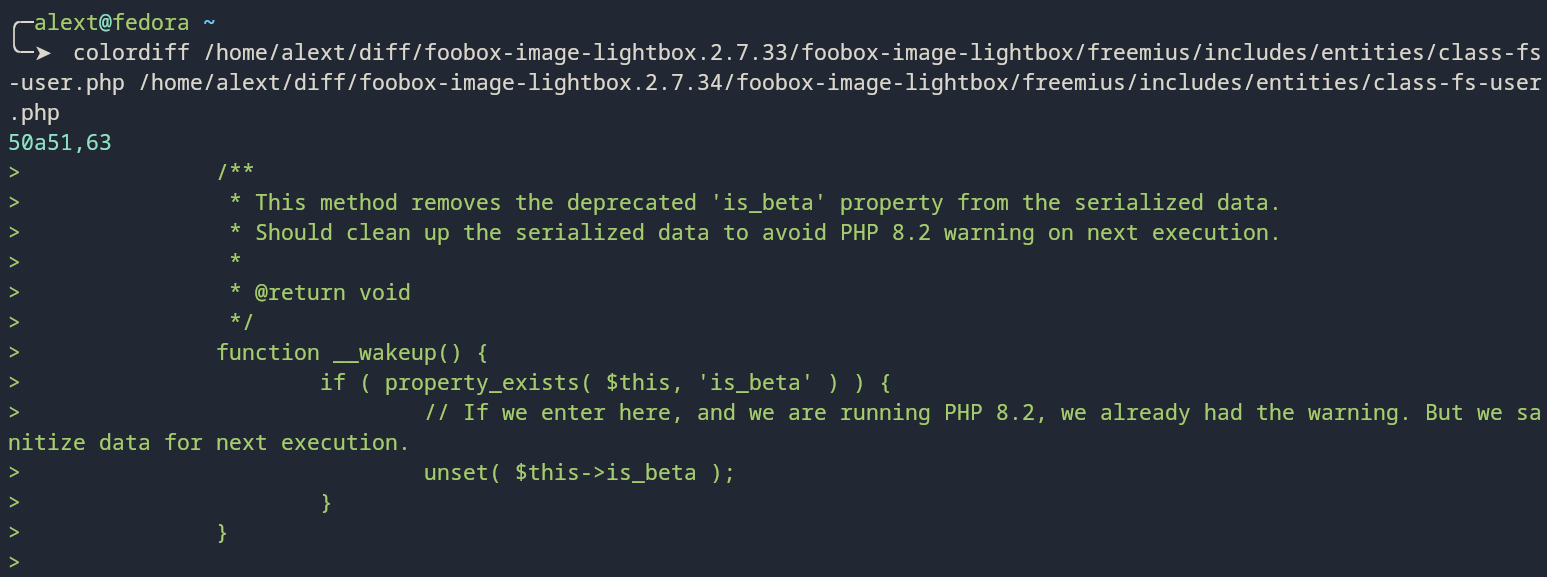
colordiff -r diff/plugin-v1/ diff/plugin-v2/

WordPress Plugins and Themes Repository
The WordPress plugin and theme directory web pages provide information that is useful to vulnerability researchers. Specifically, it includes information about a plugin or theme, changelogs, links to older versions of the software, and access to the plugin or theme’s code. This information can be useful when:
- You want to understand how a vulnerability was introduced or patched.
- You need to diff versions of a plugin or theme.
- You’re tracing the history of a specific file or function.
- You’re checking whether a plugin has been actively maintained, or if it’s potentially abandoned.
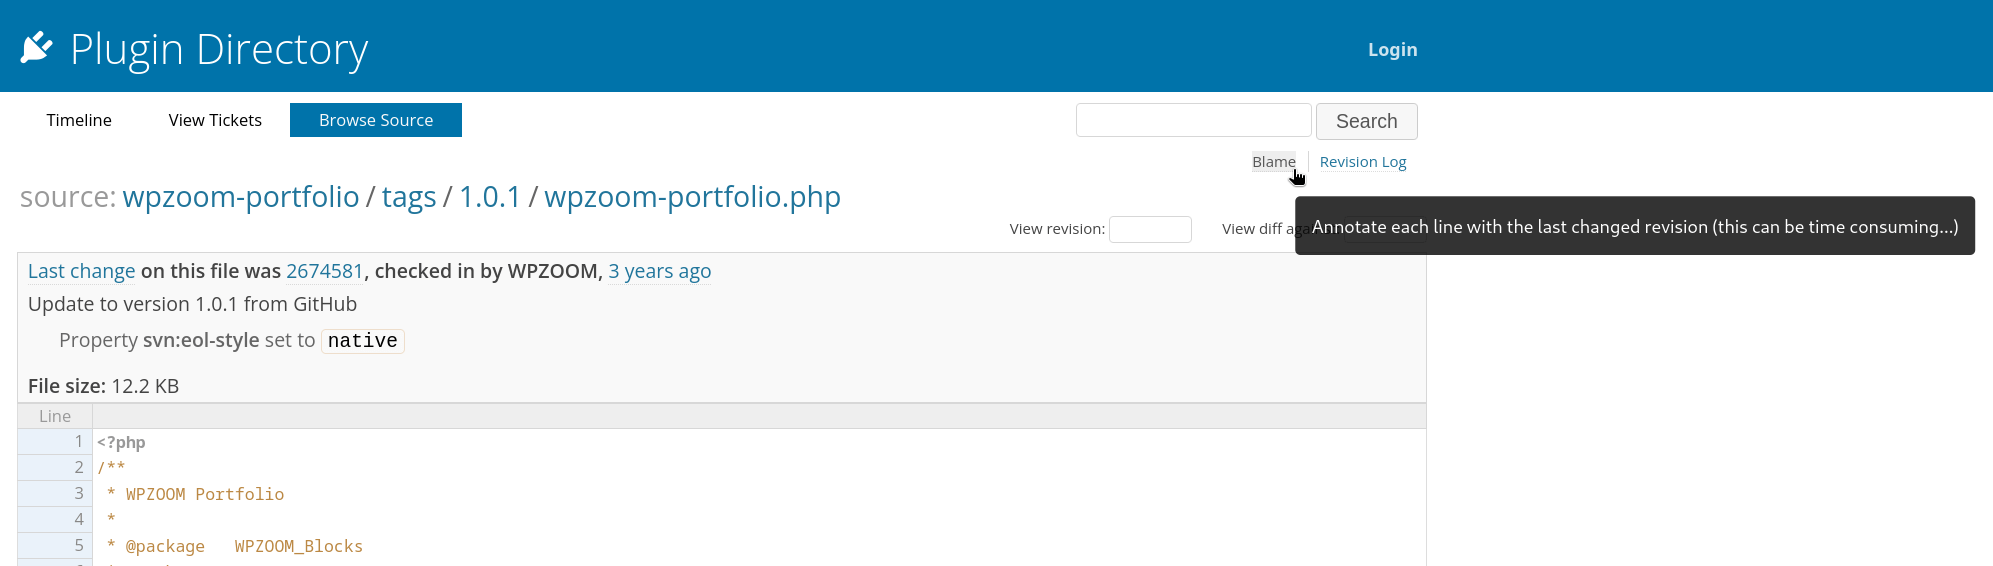
These repositories use SVN (Subversion), for version control, and this is made available via Trac’s SVN web interface.
SVN Repository Structure
Every plugin and theme hosted on WordPress.org has a public SVN repository with this basic layout:
/trunk/    	→ Latest development version
/tags/     	→ Versioned releases (e.g. /tags/1.2.3)
Other folders such as /branches/ or /assets/ may be present but are generally irrelevant.
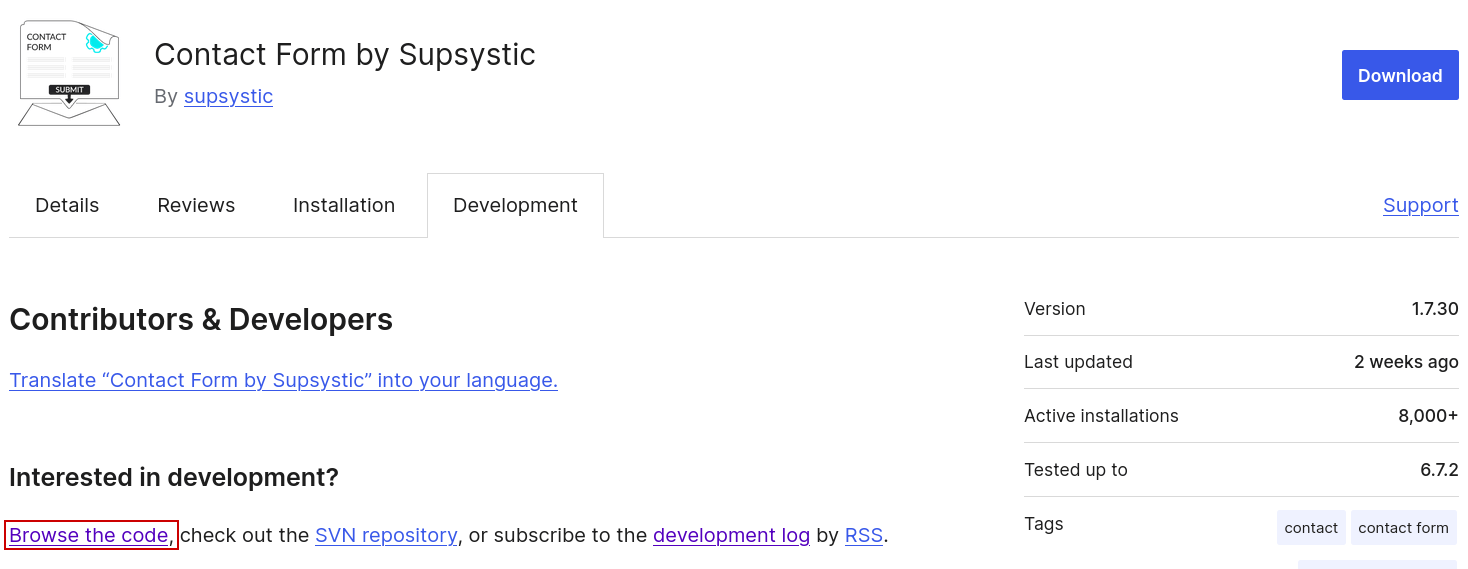
For plugins, the SVN repository can be accessed from the Development tab of the plugin page via the Browse the code link under the Interested in development? Heading.
For themes, the SVN repository can be accessed from the Browse in Trac link on the bottom right portion of the main theme page under the Browse the code heading.

Using Blame Functionality in Trac
Trac’s built-in “Blame” functionality lets you view the commit history associated with each line of code in a file. This feature helps you quickly identify who made a change, when it was made, and why. You can use this functionality directly within Trac’s web interface by navigating to the desired file (in /trunk/ or /tags/ and clicking the “Blame” link in the top right hand corner.
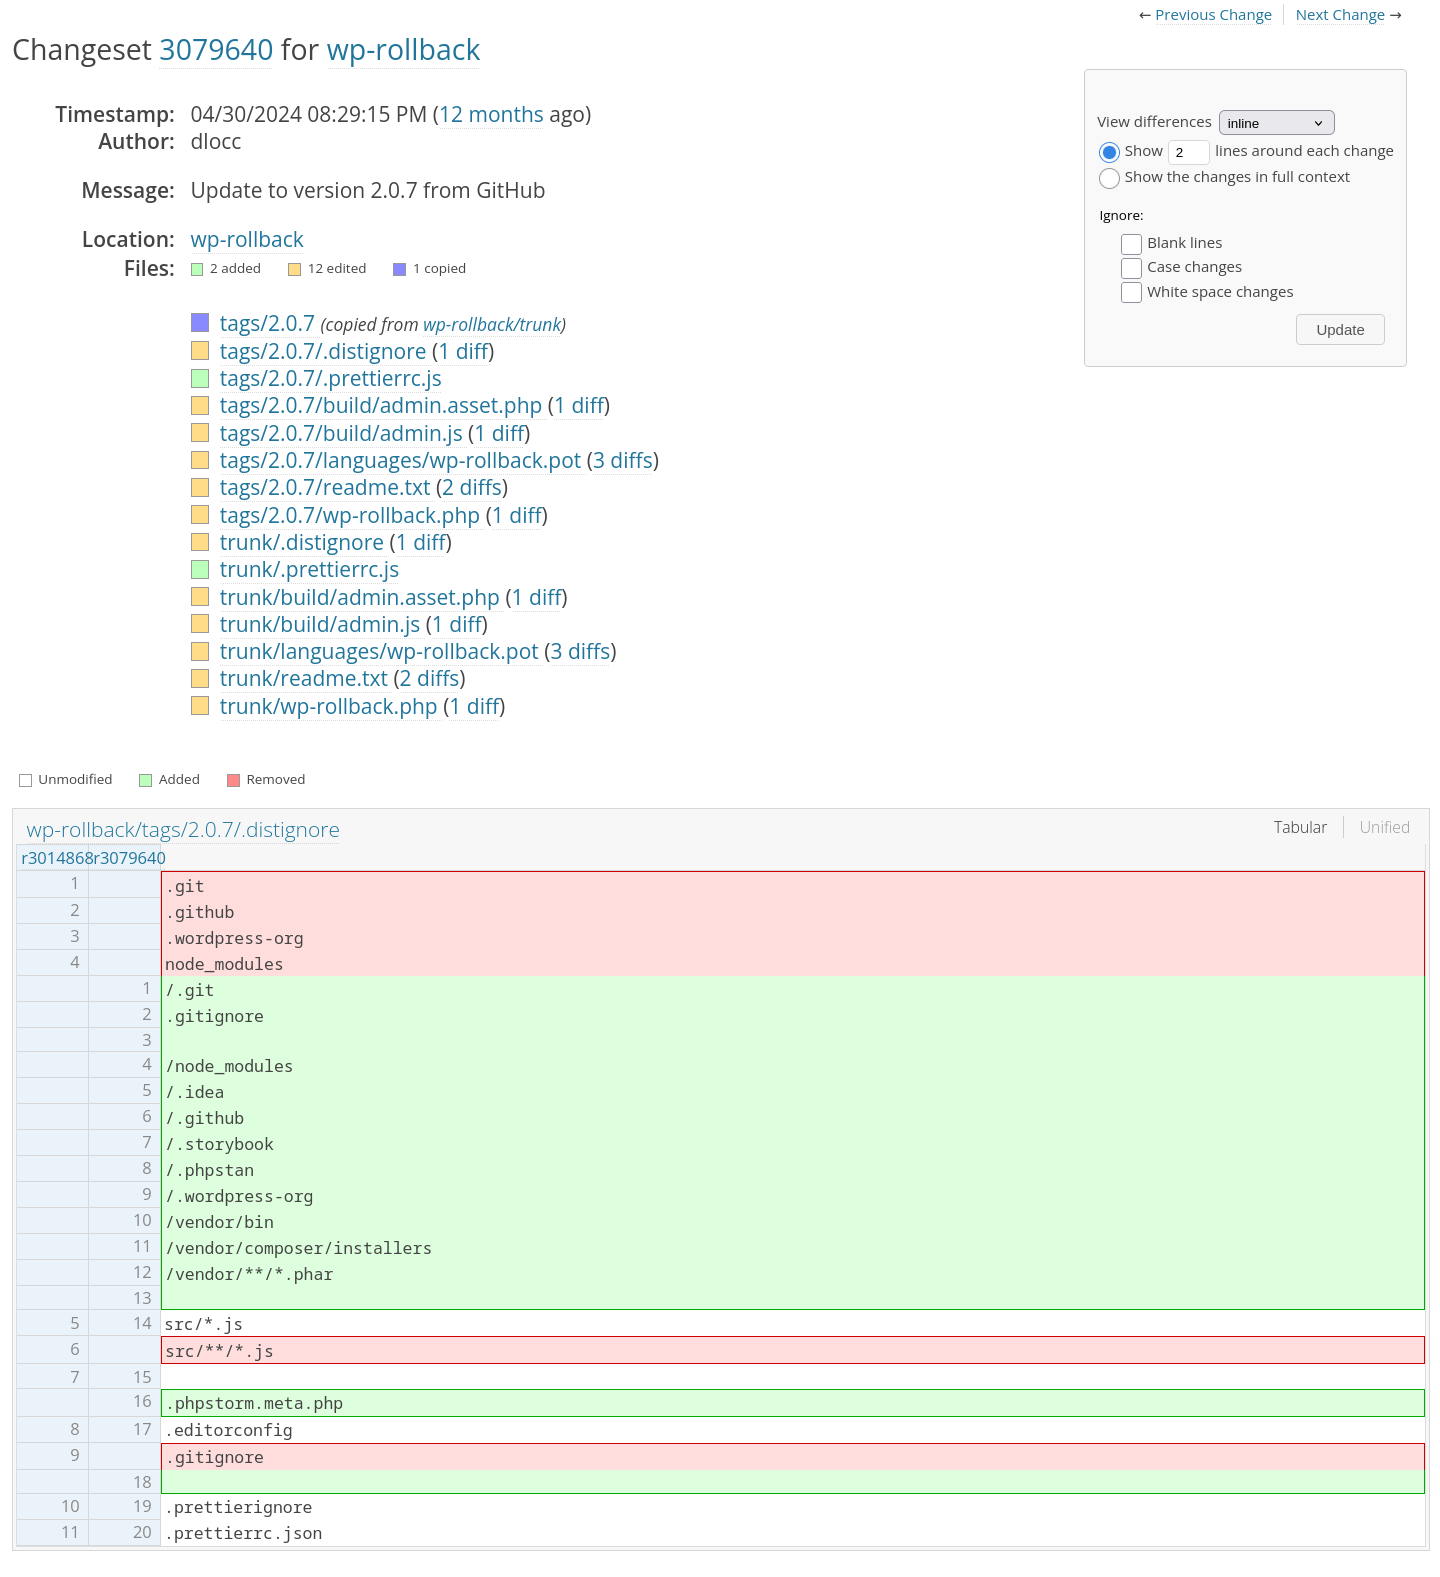
Development Log Changesets
Every plugin and theme listed on WordPress.org has a Development Log that shows a changelog of commits made to its repository. This view is powered by Trac and includes access to changesets, which are specific snapshots of what was added, removed, or modified in a given commit.
You can access it like this:
- Go to any plugin’s WordPress.org page.
- Example:
https://wordpress.org/plugins/wp-rollback/
SSRF Testing
You can test for SSRF by observing whether the server makes an outbound request to a controlled location. There are three main strategies.
Burp Suite Collaborator
If you’re using Burp Suite Professional, you can take advantage of Burp Collaborator — a feature that generates a unique external endpoint and detects when the target server makes DNS or HTTP requests to it.
To use this feature:
- Right click in the value area of the suspected vulnerable parameter in a request (either in an intercepted request or a request in Repeater).
- Choose “Insert Collaborator payload“. Burp will insert the unique remote endpoint into the value of the parameter.
- Monitor the Collaborator tab for any interactions.
Local SSRF Testing with python -m http.server
To test whether WordPress can make requests to localhost, spin up a quick HTTP server on your machine:
python3 -m http.server 8000
Then use a URL like this in the vulnerable parameter:
http://127.0.0.1:8000
If the server makes a request, your terminal will log the connection, which is a great way to confirm internal SSRF behavior.
Remote SSRF Testing with webhook.site
https://webhook.site provides you with a unique, publicly accessible URL that logs incoming requests in real time.
To use:
- Visit https://webhook.site
- Copy the generated unique URL (listed next to Your unique URL)
- e.g.
https://webhook.site/4e5073c4-d72a-4e7a-993b-a4fdcabd3bba
- e.g. ?url=
https://webhook.site/4e5073c4-d72a-4e7a-993b-a4fdcabd3bba
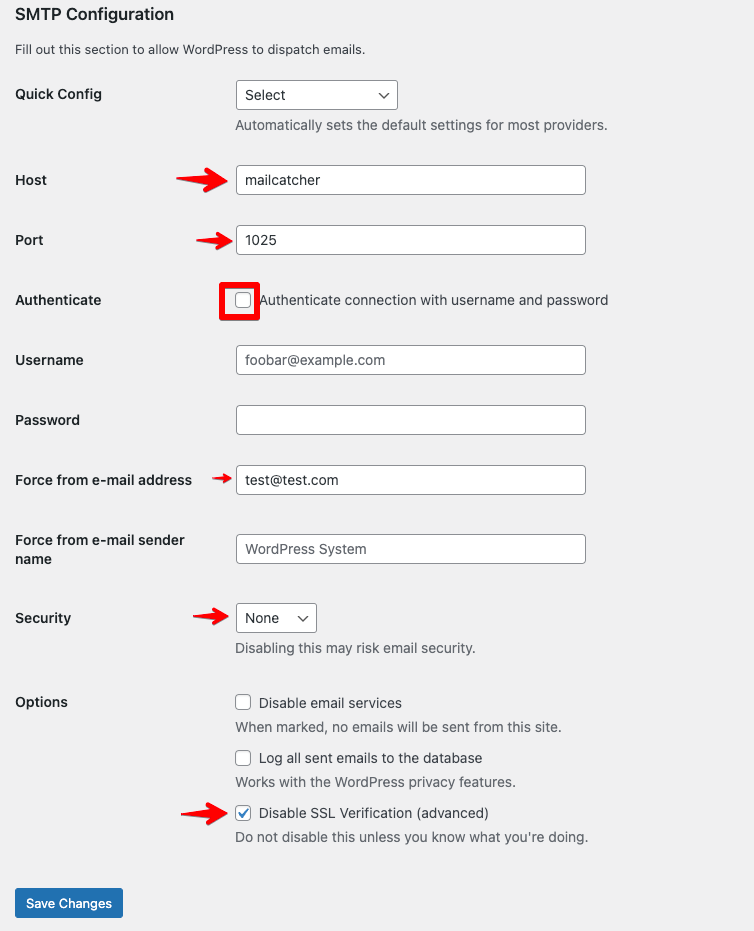
Handling WordPress Email MailCatcher, MailPit, or Email Plugins
If you’re testing email-related features like password resets, user invites, or notifications, you’ll want to capture outgoing mail without sending anything to the real world or manually setting up local SMTP/POP servers.
Wordfence Docker
MailCatcher is built into the Wordfence Docker package and listens on port 1080 (UI) and 1025 (SMTP).
To use Mailcatcher, you’ll need to install an SMTP plugin such as WordPress Simple SMTP.
Once installed:
- In the WordPress Admin Dashboard, go to Settings -> Mail
- Set the Host to “mailcatcher”, set Port to “1025” and make sure all authentication and security settings are disabled.
- You can view caught emails by going to http://localhost:1080
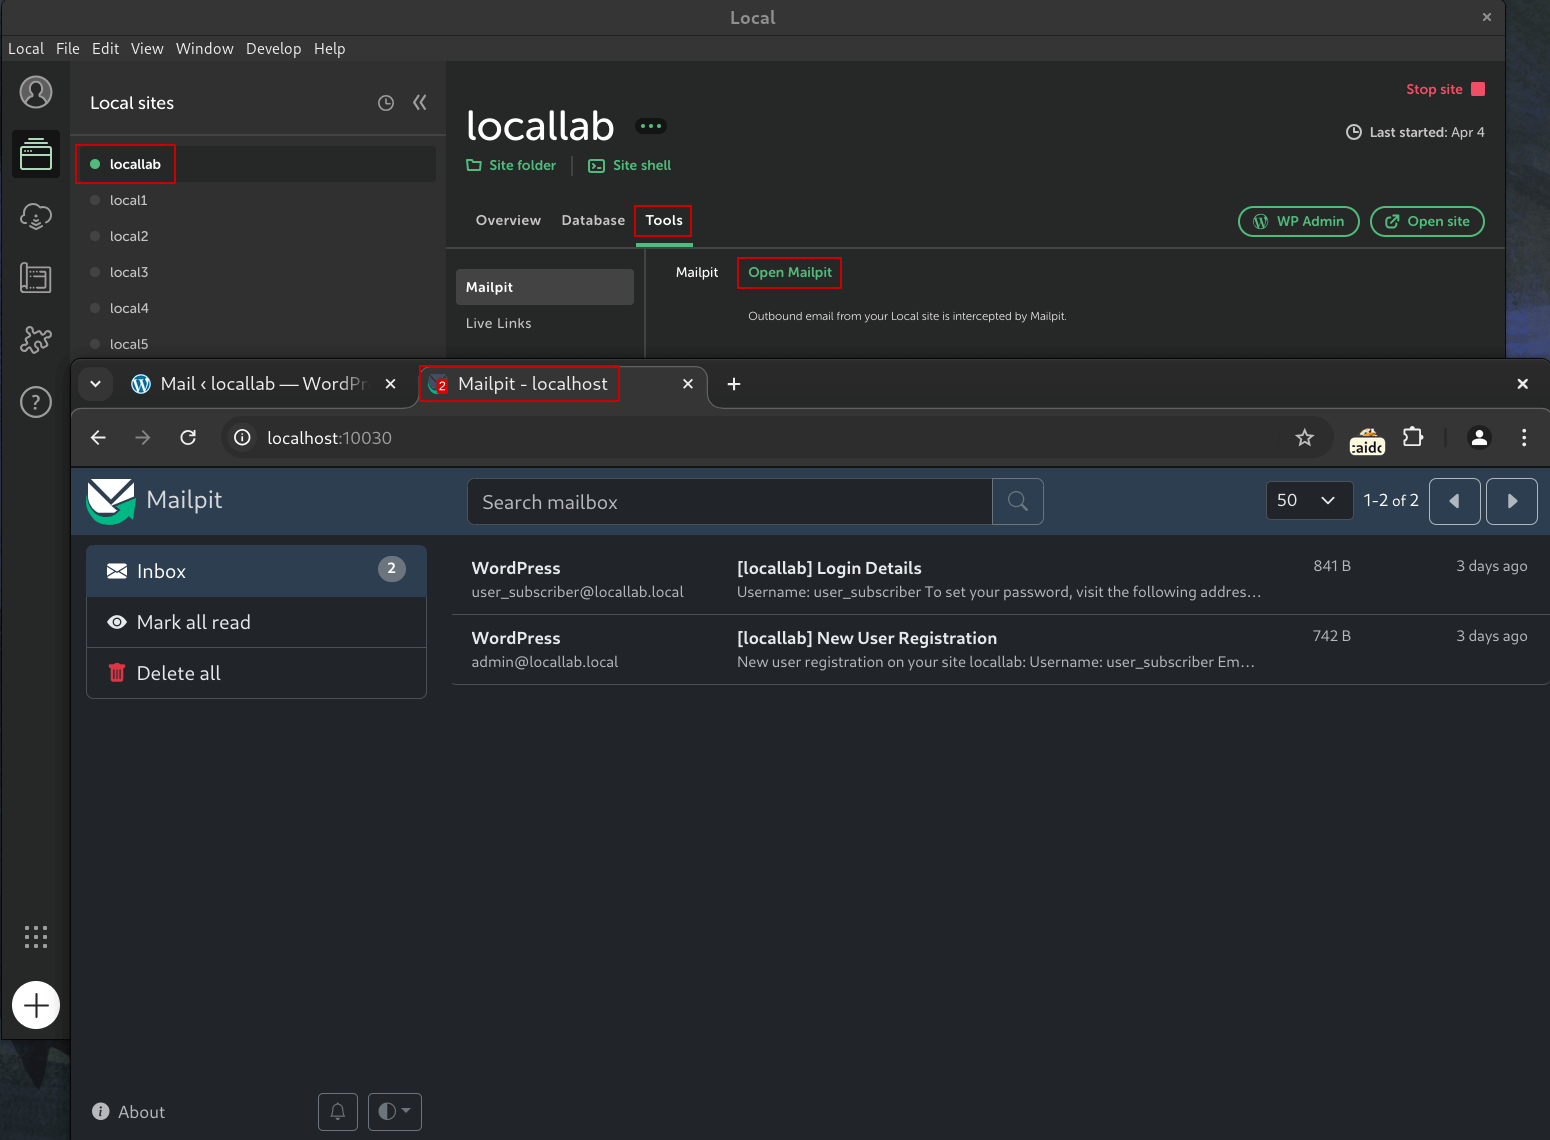
WPEngine’s Local
Local comes with Mailpit installed and configured. Simply go to the Tools tab of your Local WordPress instance and click Open Mailpit to view the web application in your browser.
Mail Plugins
As an alternative to Mailcatcher or Mailpit, you can use simple email plugins like WP Mail Catcher or Lana Email Logger. These plugins log emails generated by WordPress and display them in the WordPress admin dashboard even when no SMTP configuration is present. However, note that, in our experience, this won’t work for every case where mail is needed in a vulnerability chain. The Wordfence example configuration for Devbox installs WP Mail Catcher.
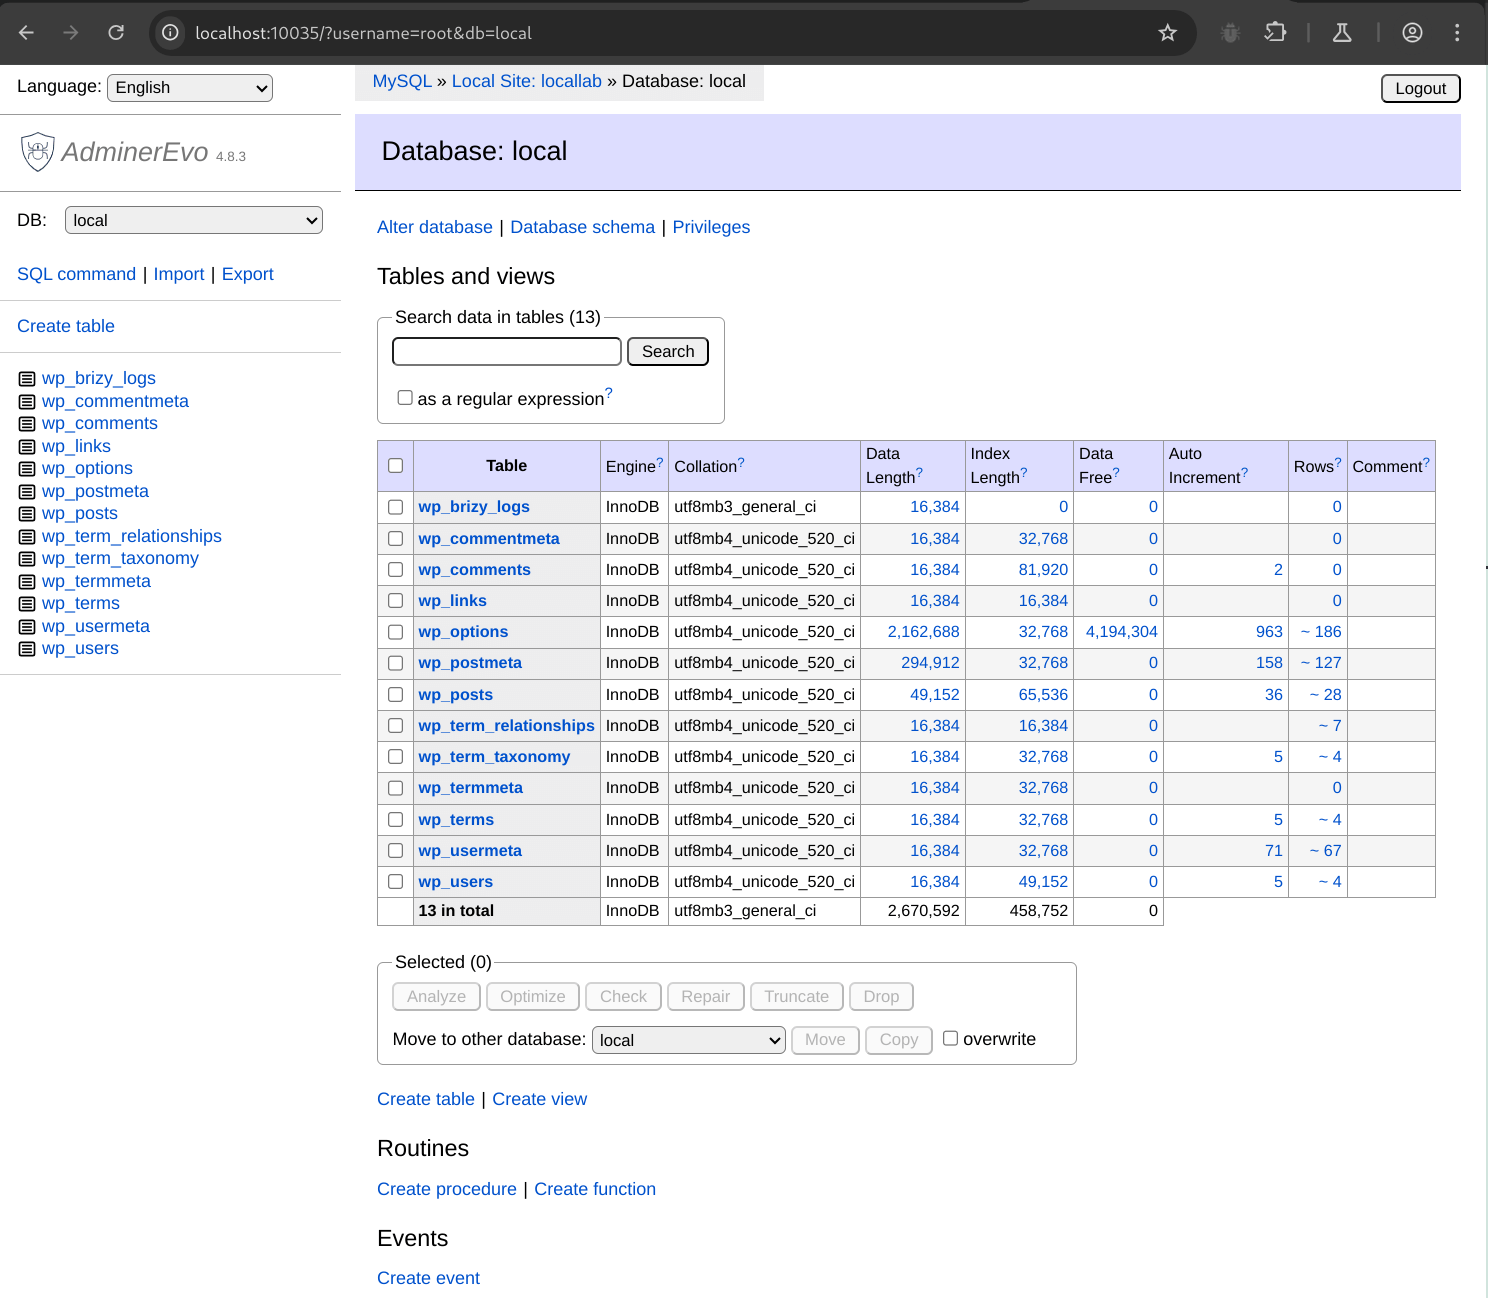
Database Management with Adminer and AdminerEvo
AdminerEvo is a lightweight, single-file PHP script for managing MySQL databases. It’s a great alternative to phpMyAdmin as it’s faster, simpler, and easier to drop into your WordPress environment without installation.
Wordfence Docker
The Wordfence Docker package comes with Adminer. You can access Adminer by navigating to http://localhost:1337/adminer.php and entering the following details.
Server: mysql-wpd
Username: mydbuser
Password: mydbpassword
Database: mydbname
WPEngine’s Local
Local comes with AdminerEvo installed. Accessing it is simply a matter of selecting your WordPress instance, clicking the Database tab and clicking Open AdminerEvo.
Devbox
The Wordfence Devbox configuration comes with AdminerEvo installed. You can access this by navigating to http://localhost:8081/adminer.php. Instructions to login are provided in the Wordfence Devbox README.md file in the Github repo.
Adminer Usage
Adminer is relatively straightforward to use. Accessing adminer.php presents you with a login page. The only thing to note is that sometimes you may need to enter in 127.0.0.1 instead of localhost if your MySQL or MariaDB server is running locally.

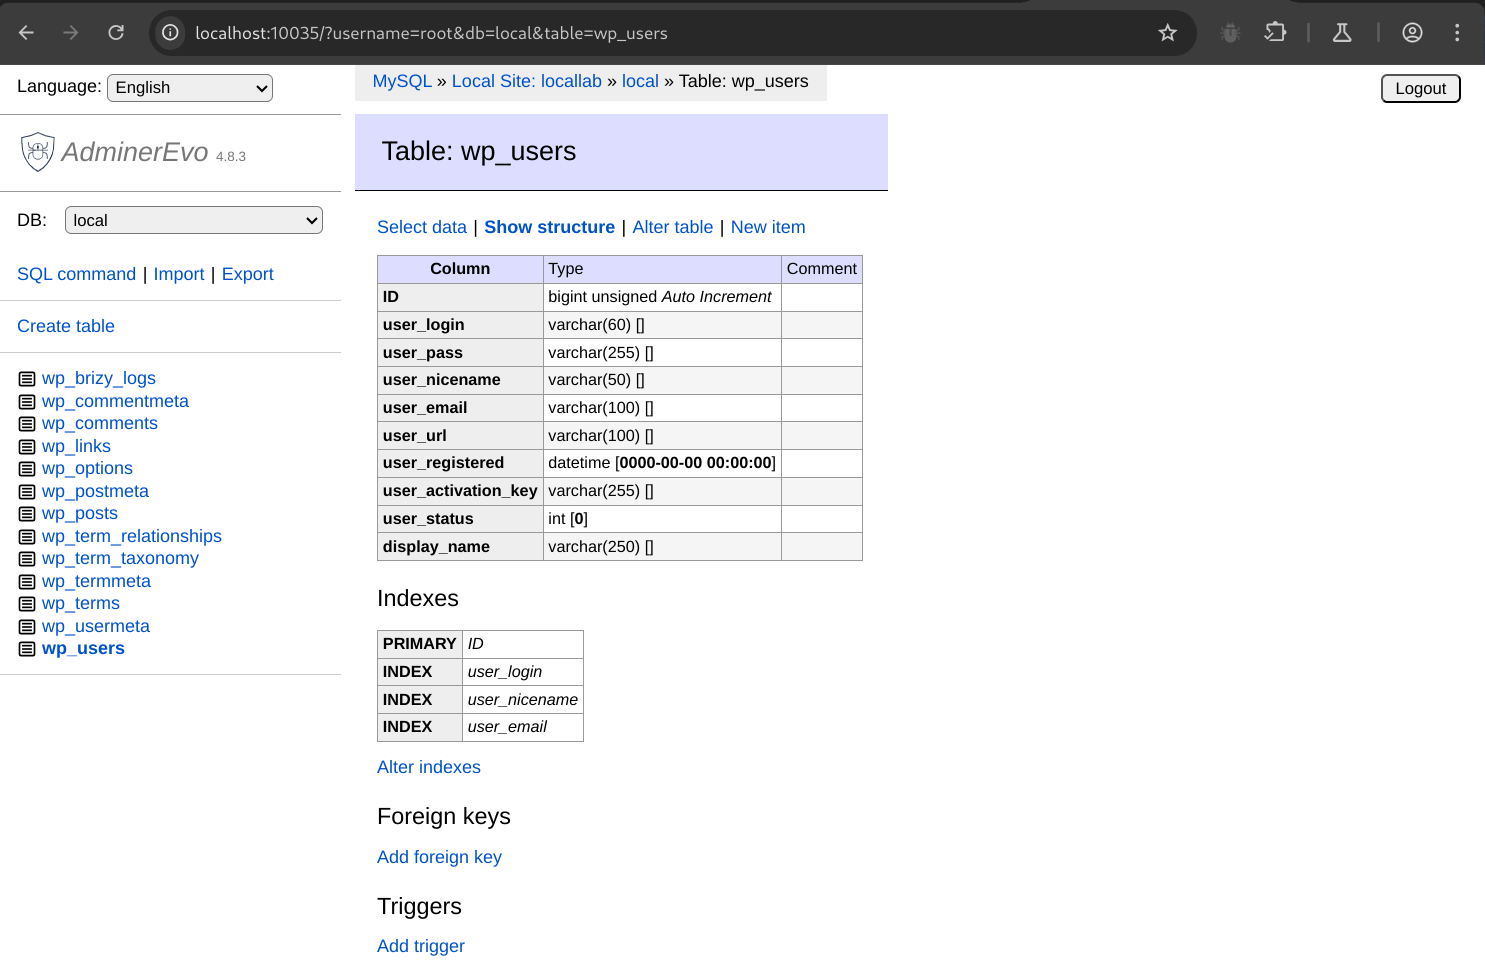
Once logged in, you’ll be presented with a list of tables.
Clicking on any of these tables will display the structure of that table.
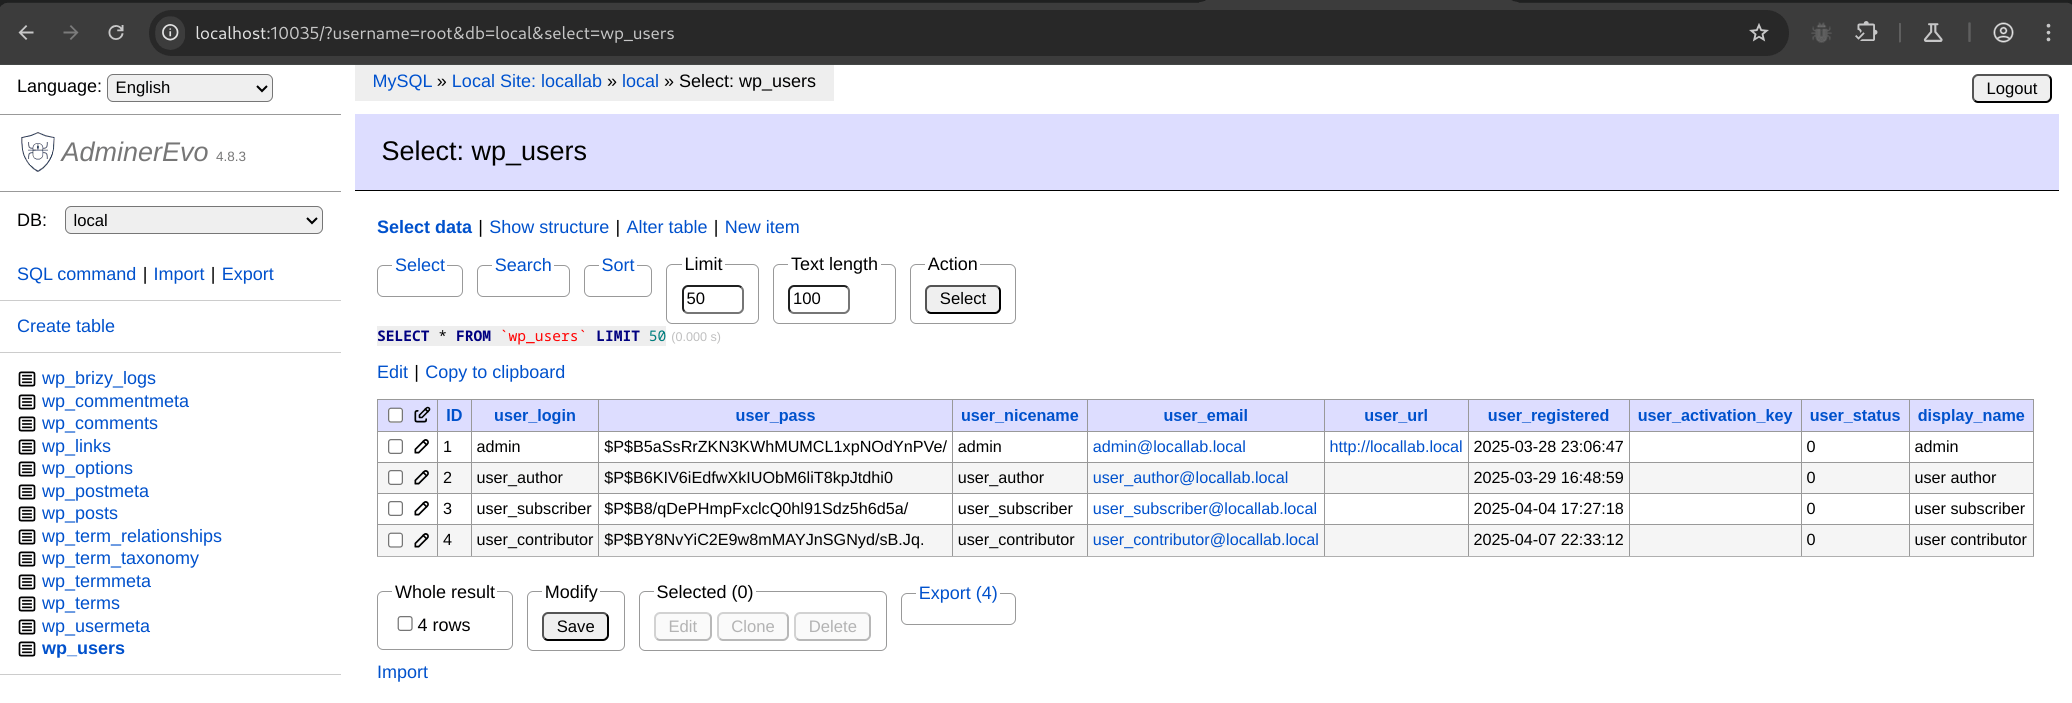
Clicking Select data will show the first 50 rows of the selected table.
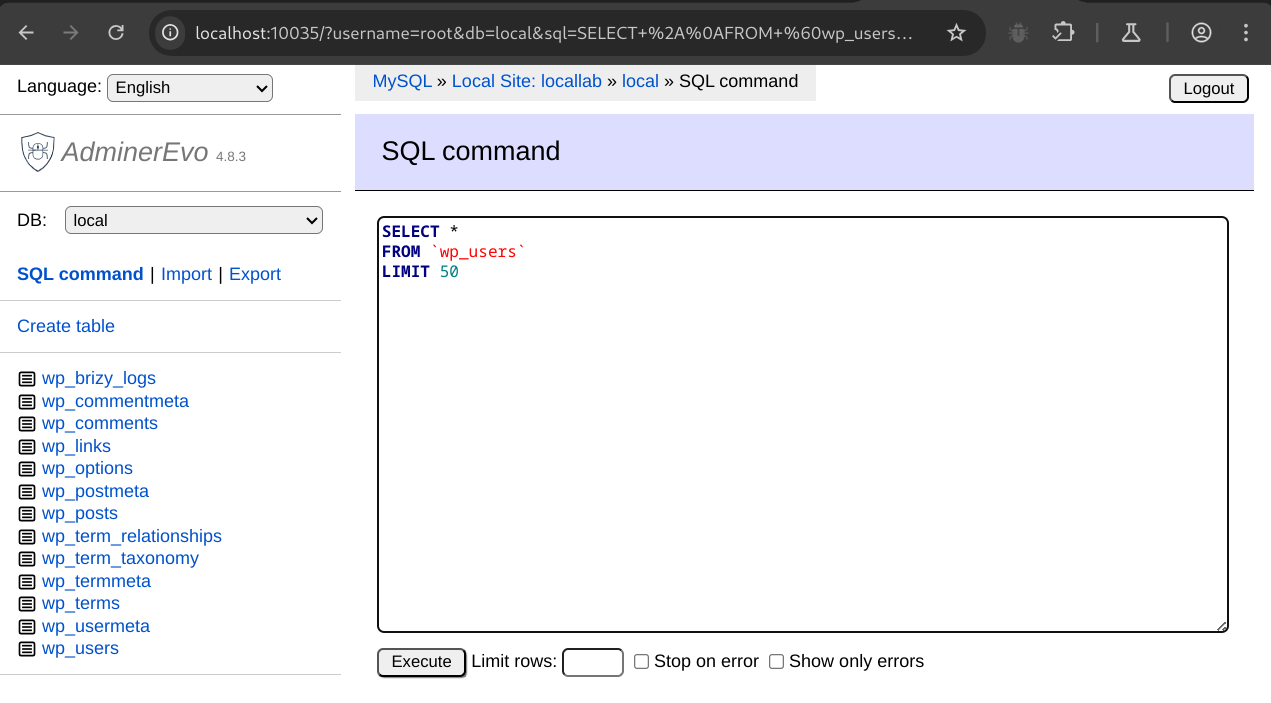
From here, we can click Edit to modify and execute the SELECT query.
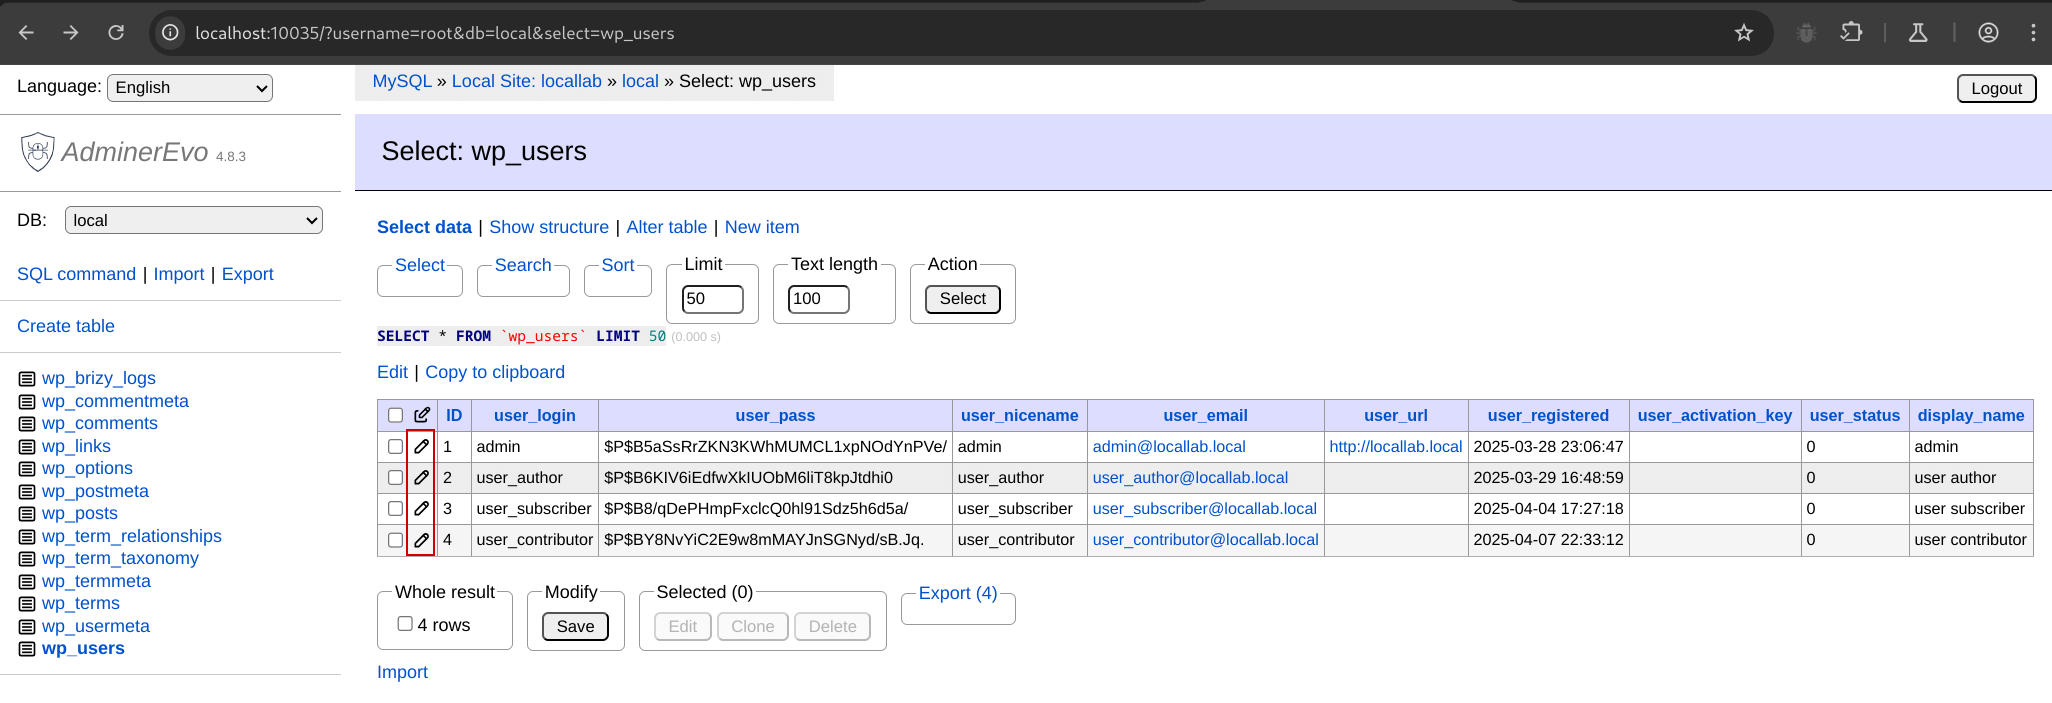
Clicking the Pencil icon for a given row will allow you to edit the contents of the record.
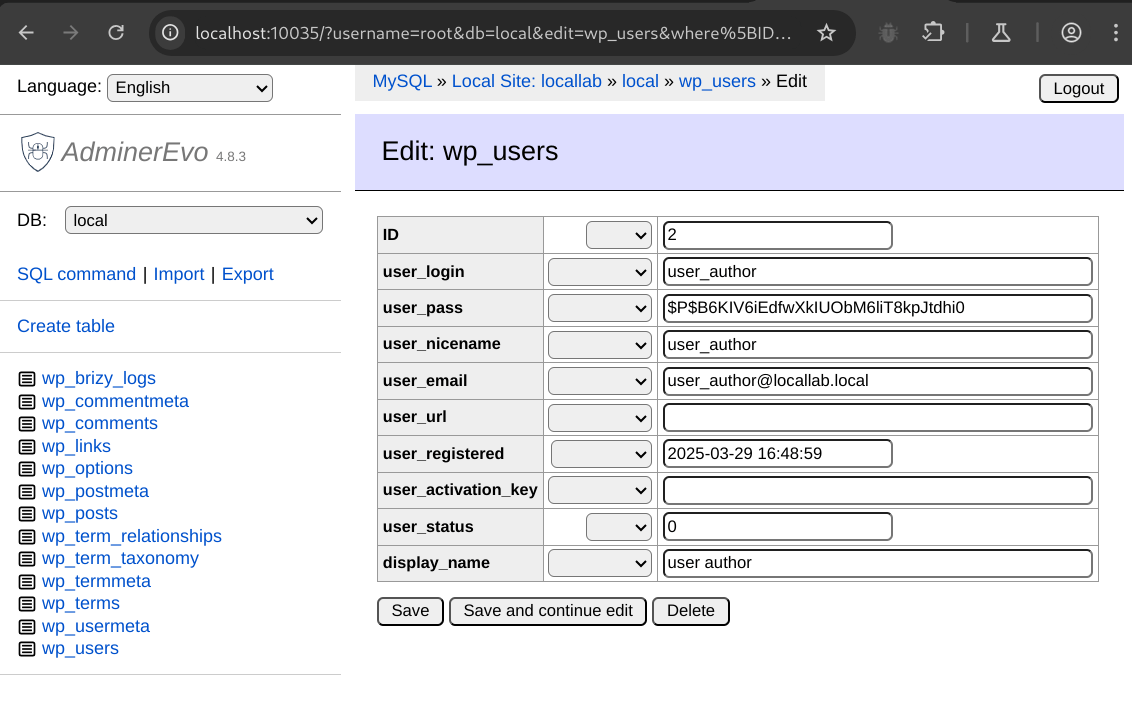
Adminer is sufficiently featureful to provide everything you need to view and modify tables, run raw SQL queries, and inspect plugin and theme created tables and relationships.
Security-Specific Tools
SQLMap
SQLMap is an automated tool for detecting and exploiting SQL injection vulnerabilities. It can be useful for testing WordPress plugin and theme parameters that may be vulnerable to SQL injection. We recommend all researchers get familiar with manually testing and exploiting SQL Injection vulnerabilities, but SQLMap can definitely be helpful in tricky situations.

PHPGGC
PHPGGC (PHP Generic Gadget Chains) is a tool for generating serialized PHP payloads for use in PHP object injection vulnerability exploitation. It includes pre-built gadget chains for libraries like Monolog, SwiftMailer, Laravel, Guzzle, WordPress and more. This tool can be useful if you have a deserialization vulnerability and an already documented gadget available to leverage for RCE.
If you find an unserialize(), maybe_unserialize(), or PHAR deserialization vector, PHPGGC can help craft a working payload.
These chains may not work on PHP 8+. Make sure to test in your PHP 7.4 instance if you’re unsure.
Researcher Made Tools and Resources
- https://wpctf.org/ – WordPress Capture the Flag by researcher Stealthcopter
- https://wpctf.org/guides/ – especially helpful information for getting set up
Conclusion
With the details contained within this post, you should now be able to implement a fully functional WordPress security research lab tailored for vulnerability discovery. Whether you go with Wordfence’s Docker package, WPEngine’s Local app, or a custom Devbox config, your environment will be capable of emulating different WordPress environments with different web servers, PHP versions, and MySQL versions. Additionally you should now have all the basic tools needed to intercept HTTP traffic, debug with XDebug, view and modify the WordPress database, and intercept email for features like password resets. You’ll also be aware of supporting tools like WPDirectory, grep and ripgrep, WP-CLI, SQLMap, and PHPGGC to assist in your workflow and identifying vulnerabilities faster.
A solid, flexible lab frees you up to focus on actual research and vulnerability testing instead of spending time setting up software. As you embark on your journey to find new vulnerabilities, your WordPress research lab will help keep you focused on the main task.
Stay tuned for the next part in our beginner vulnerability research series where we’ll start applying what we’ve learned over the past 3 parts. Don’t forget to register as a researcher for our Wordfence Bug Bounty Program and join our Discord to engage with the Wordfence Threat Intelligence team and other security researchers! Happy hunting!
The post WordPress Security Research Series: Setting Up Your Research Lab appeared first on Wordfence.